Table of Contents
1) Introduction
2) Printer un-boxing and installation
3) Getting to know your TRILAB DeltiQ 2 printer
4) Making your first DeltiQ 2 print
5) Cheat sheet – standard printing procedure
6) How to use the DeltaControl display and application
7) How to use the WebControl online interface
8) Installing the printer on your own
9) Printer service procedures
The DeltaControl display is executed using the smartphone placed in the charging station on the printer frame and the DeltaControl application loaded on the operating system of the phone.
If the device is switched off, the application must be started using the icon on the screen when the device is switched on again.
Caution: We strongly discouraged using the DeltaControl display as your personal phone. There is no guarantee that the application will run smoothly if the system is interrupted or other components are installed on the device.
Warning: If you turn off the printer (rocker switch on the power supply) and you know that you will not be using it for an extended period of time, you should also turn off the DeltaControl display. This will prevent any issues from happening with the phone battery.
Delta Control interface
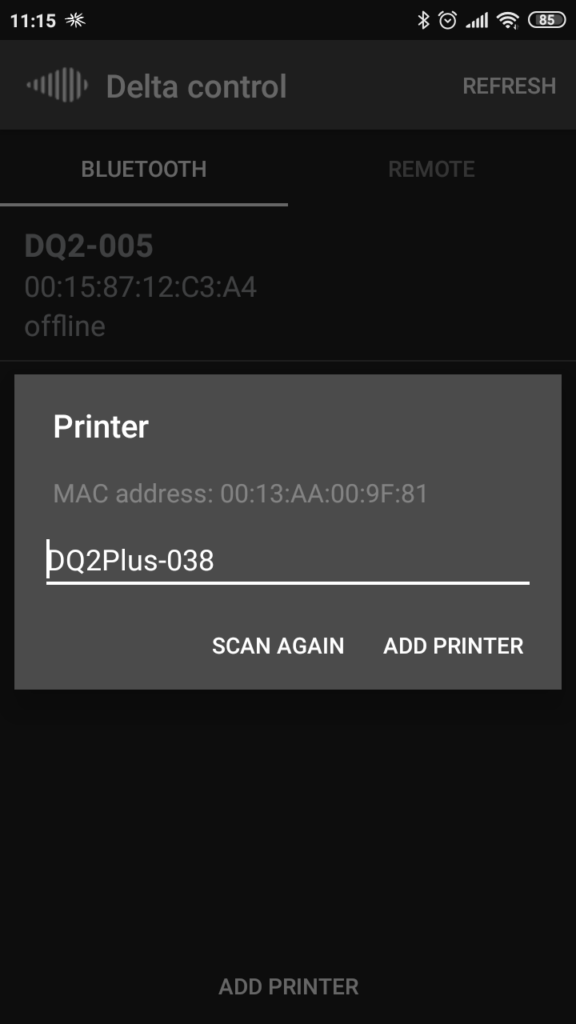
When DeltaControl starts, it displays a list of one or more printers with which it was paired. Click on the printer to select the machine you want to control.

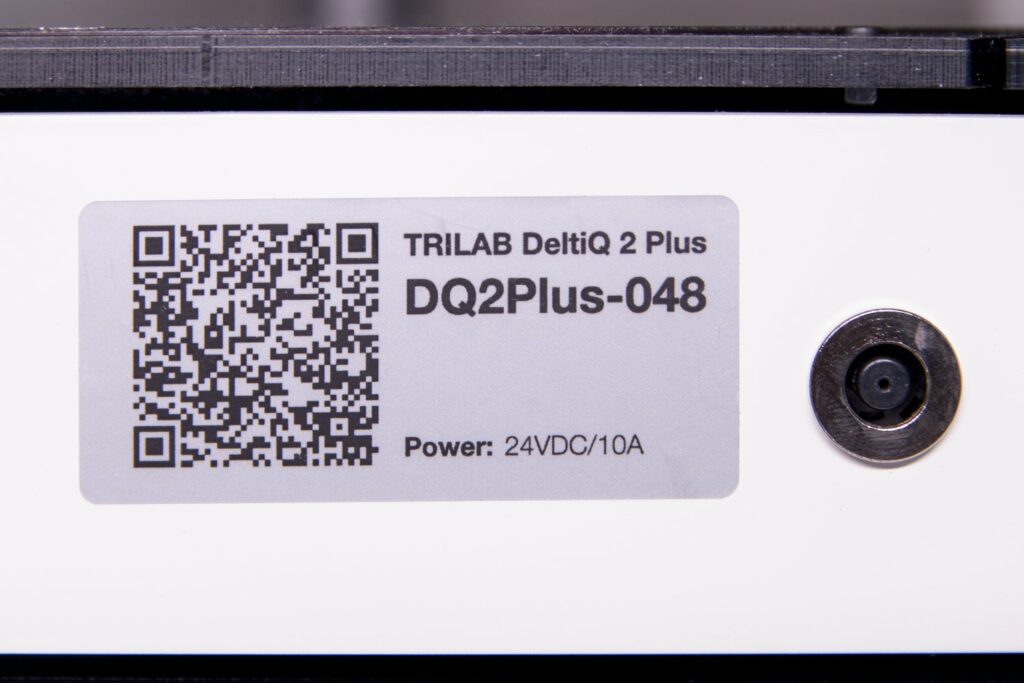
You can also add additional printers from this home screen. After pressing the ADD PRINTER button, the camera will start to scan the QR code. It is located on the lower right side of the printer next to the power connector.
After scanning the QR code, you can rename your printer and add it to your list with the ADD PRINTER button.
The Home screen
When you select the printer, it connects to the machine. The application interface is divided into sections represented by “tabs” at the bottom of the application. The Home screen provides a basic overview of the machine’s status.
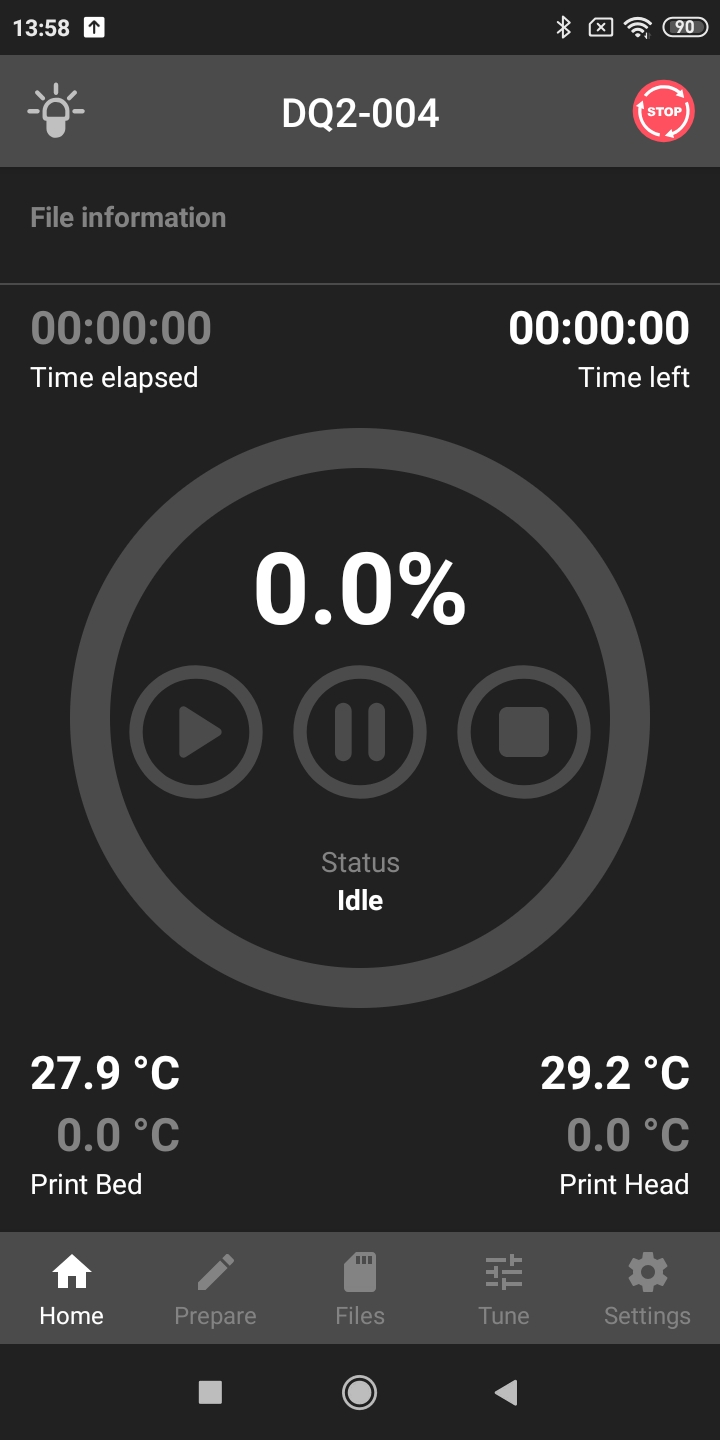
There is a section at the top containing all of the tabs. On the left you will find the icon for turning on / off the lights, in the middle the name of your printer and You will find the EMERGENCY STOP switch on the upper right corner of the application, which can be used to stop the printer at any time while it is active. The printer restarts and is ready for the next task after a short while. Pushing this switch interrupts the current print and does not allow the user to resume progress. Pushing this switch requires confirmation in the following dialog. This is a precaution against stopping your print accidentally.
Tip: If you need to stop any ongoing printer action as quickly as possible, use this EMERGENCY STOP switch.
Below the tab section, the File information shows the specified print job path. The following time indicators determine how much time has elapsed (Time elapsed) and how much is left (Time left).
Most of the home tab uses the print progress view. The red circular indicator and the numeric value indicate the percentage progress of the print job. The following three buttons are to Pause, Stop, and Play (continue) your print. The last item in this section is the status indicator.
The last items are the temperature indicators on the Print Bed and Print Head, with the upper number being the current temperature value and the lower being the desired value.
By clicking on the temperature of the pad (left) or the temperature of the print head (right) you will be immediately transferred to the temperature setting in other parts of the application.
Tabs at the bottom of the application are used to move between individual sections (screens).
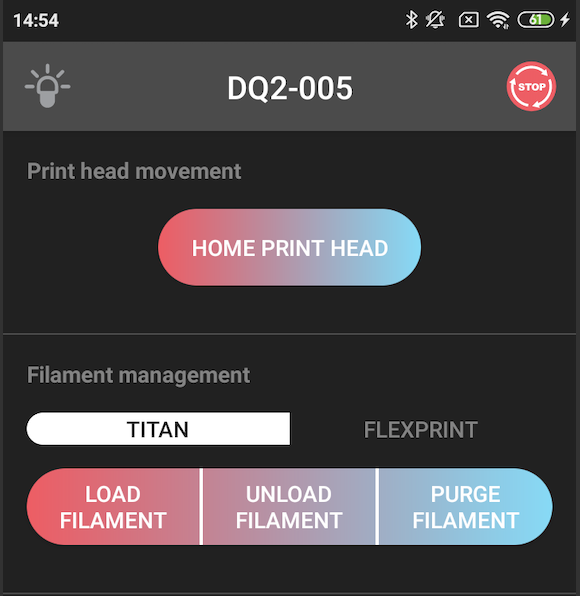
The Prepare tab
The prepare tab screen is used to enter several common commands related to printer preparation.
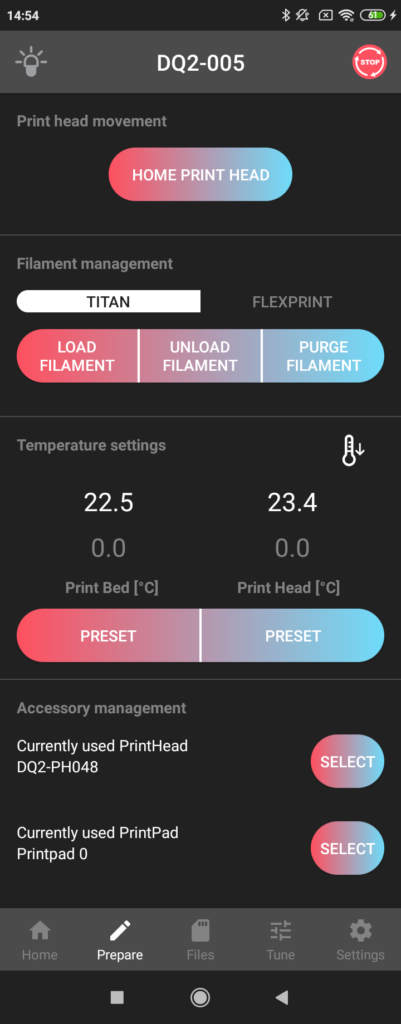
The HOME PRINT HEAD button is used to position the print head in its home position (for example, after printing has stopped).
In the Filament management section, there are buttons controlling the introduction of filament into the print head via the Titan extruder (primarily) or after switching via the FlexPrint extruder. LOAD FILAMENT ensures that the nozzle is heated to 210 °C and then the filament is drawn into the print head. UNLOAD FILAMENT is exactly the opposite action, warming up the nozzle and then pulling out the filament. If the nozzle needs to be cleaned when introducing a different type of material or a significantly different color, we recommend flushing the nozzle with the newly introduced filament using the PURGE FILAMENT button.
Caution: For loading material with melting temperature higher than 210°C, set the temperature manually (see 2 paragraphs below) and then press the command.
In the next section of the screen, Temperature settings, you can manually set (by clicking on the lower value) the temperatures for the Print Bed and Print Head. The working temperature setting is usually part of the G-code generated by the software (slicer). The thermometer button with the down arrow is used to cool the pad and the nozzle.
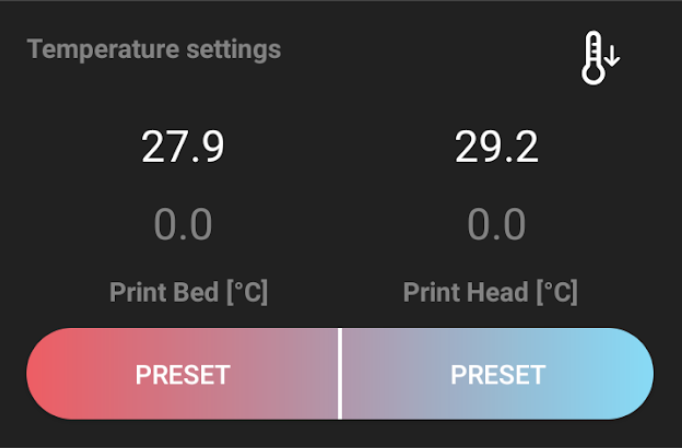
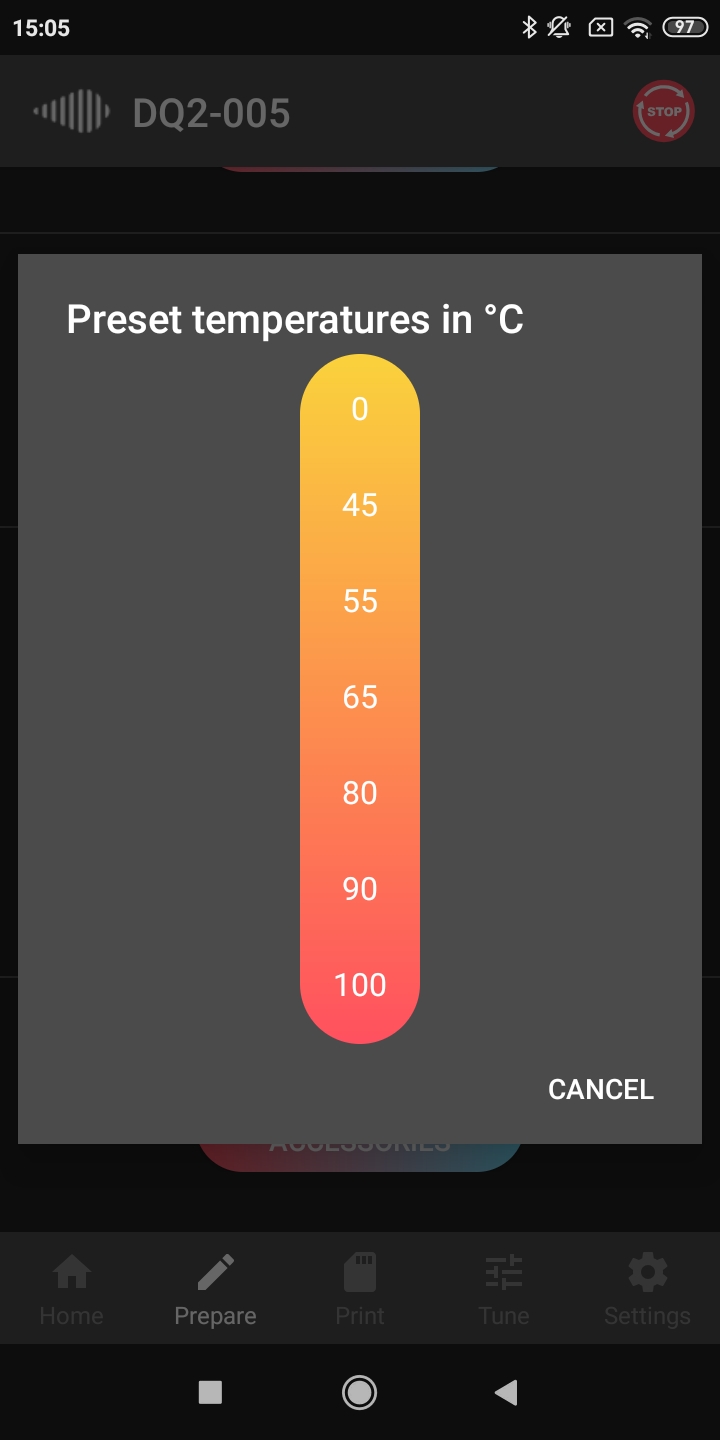
By clicking one of the PRESET buttons, you can select from the preset standard temperature values (the scale varies for the pad temperature and the print head temperature).
The Accessory management section is used for easier management and setting up multiple printheads and printheads. For each new printhead and pad, you will receive a configuration file, which you upload to the printer’s memory via the web interface (for more detailed instructions, see the section describing WebControl)
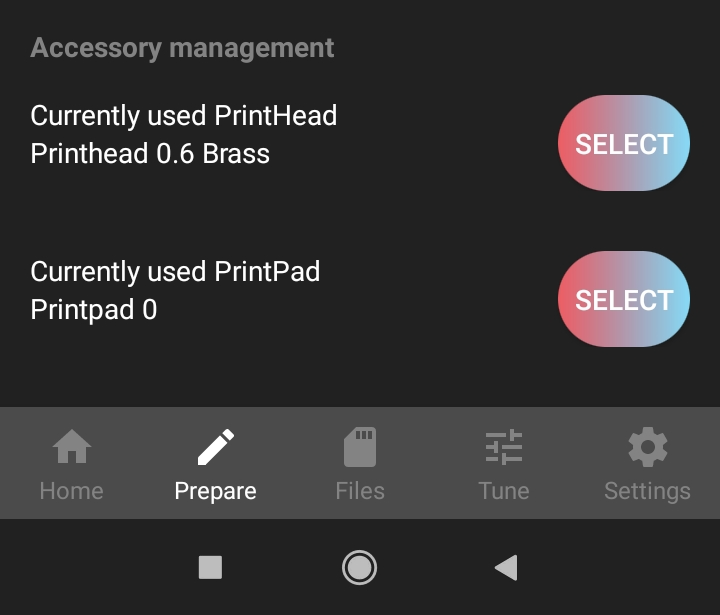
If you want to use the accessory, replace it according to the instructions and simply select the accessory from the list using the SELECT button. Each time, after such a change, the set values of the given accessory will be read (e.g. offset) and the calibration will be performed automatically before the next printing.
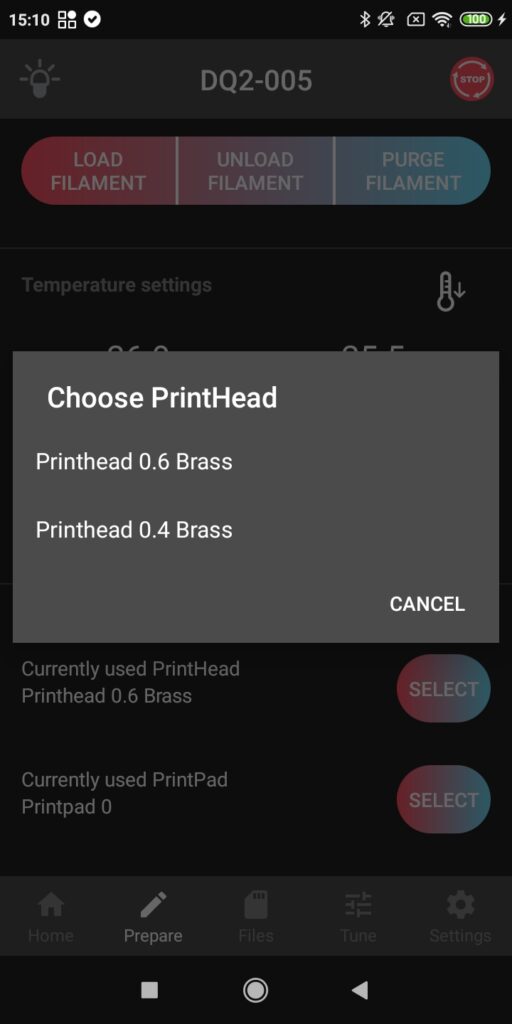
If you have more than one print head, you can alternate between them, for example, according to different sizes or types of nozzles. This simplifies the preparation process and eliminates the risk of damage during nozzle replacement.
Print screen
This screen displays the prepared print data in the printer’s internal memory (which can be downloaded via the online interface), or on a connected USB device (you can switch to a USB device in the screen header).
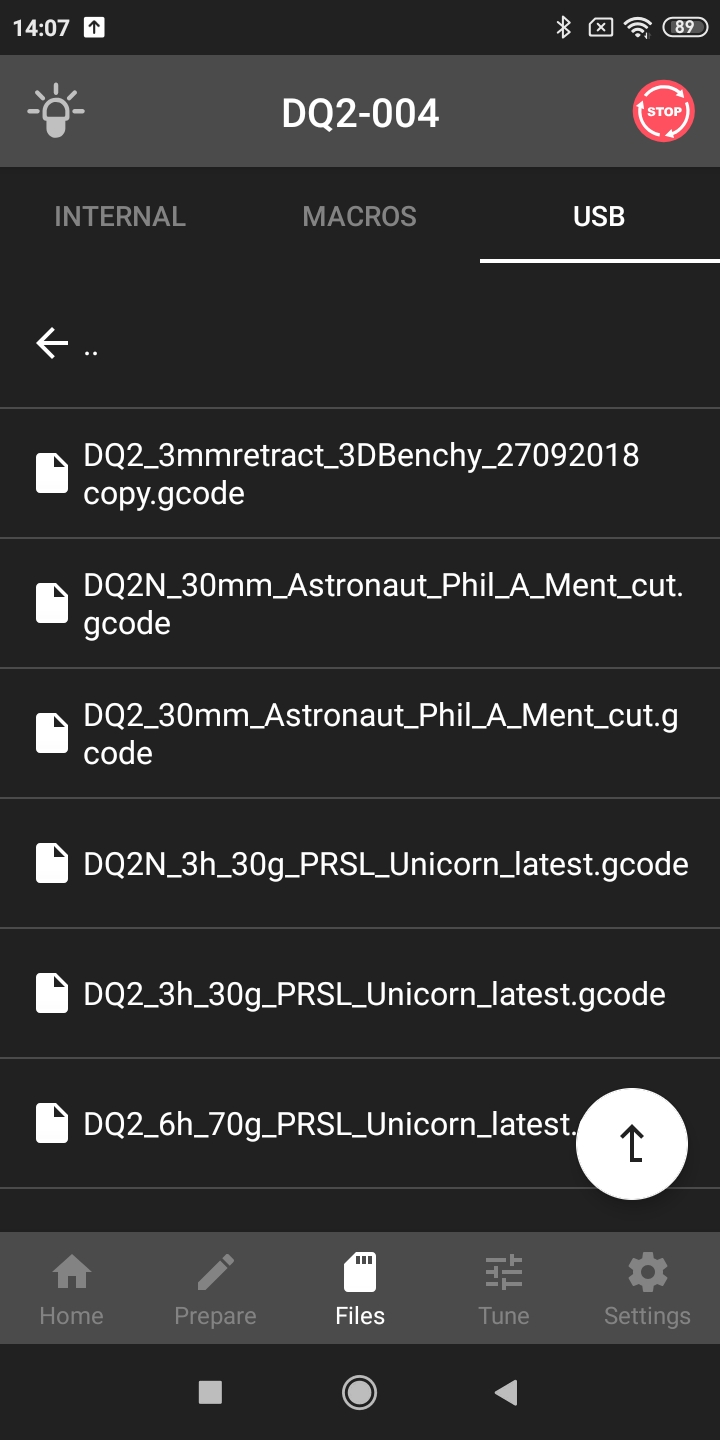
To print any file simply click on the file and confirm by Print button.
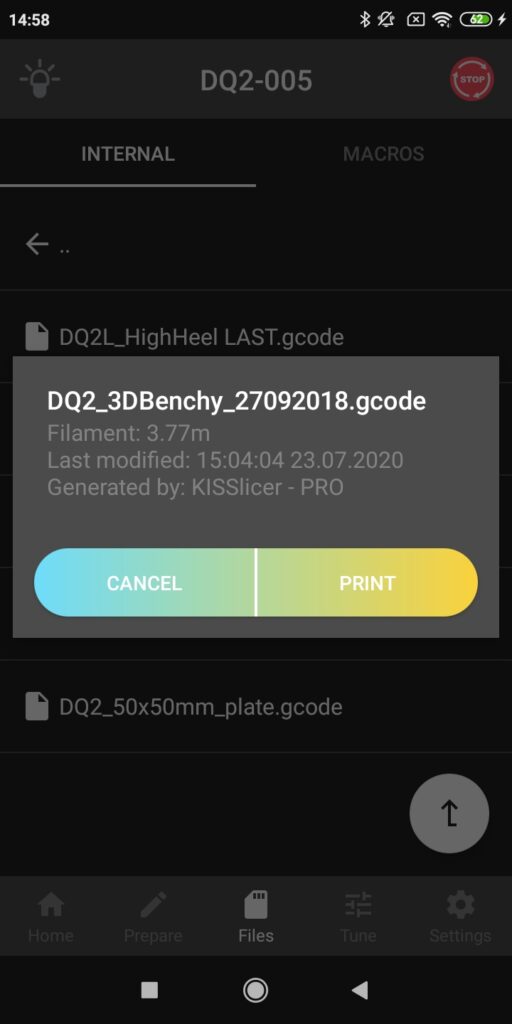
If the file is on USB driver, after pressing Pritn button, the file starts to copy into printer internal memory. Then the print begins.

You can disconnect the USB driver during printing without any print interruption. After print finishes the file is deleted from internal memory.
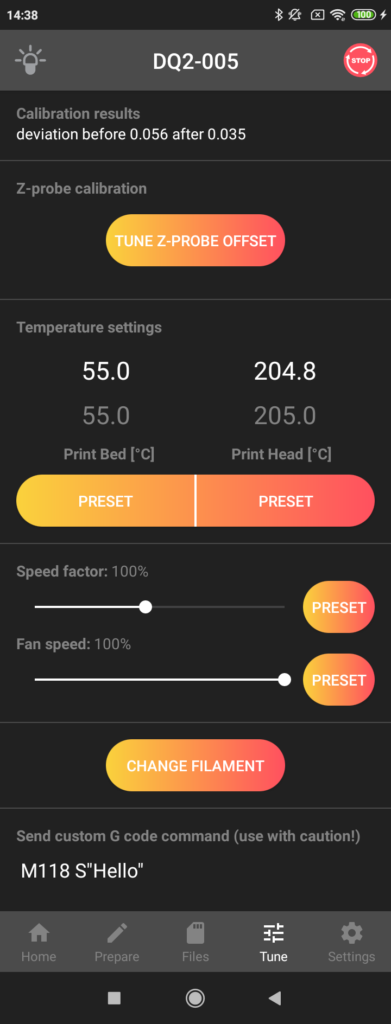
Tune screen
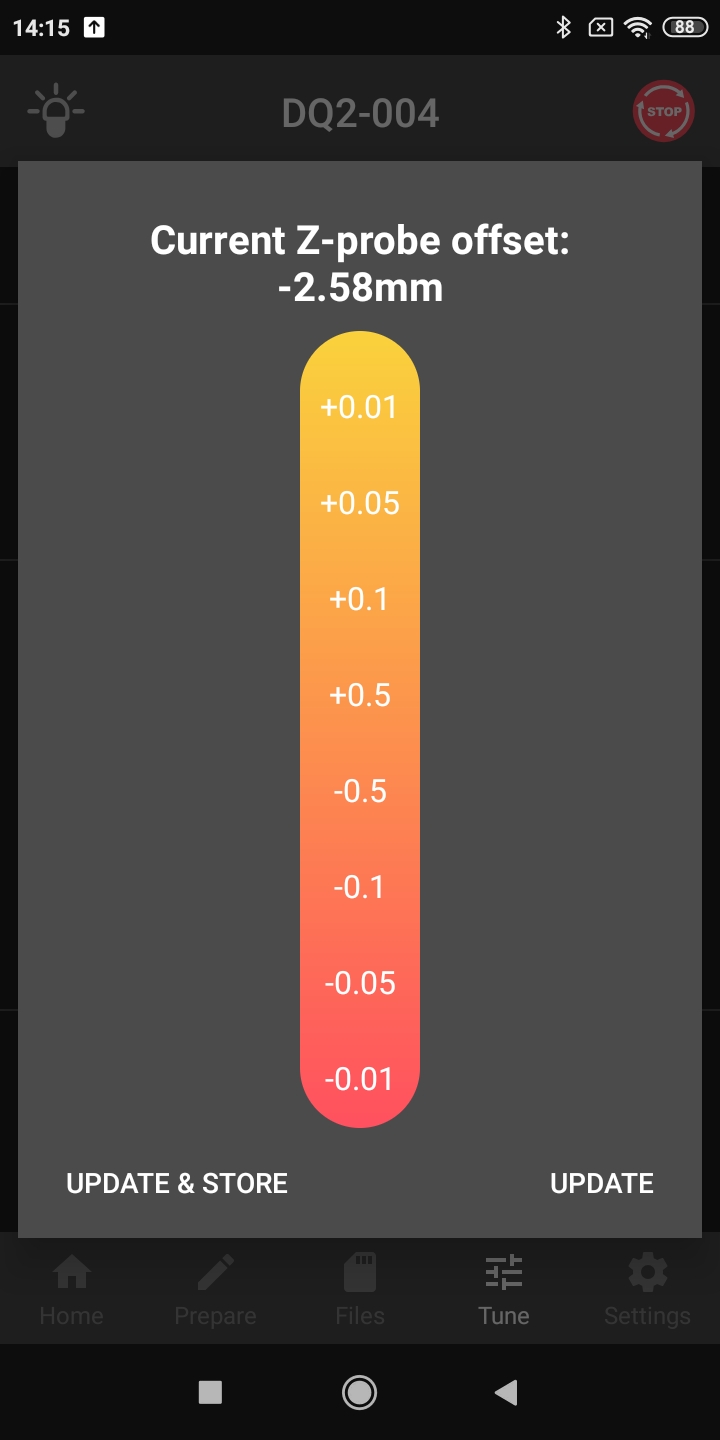
Use this section to manually fine-tune the printer and set values during printing. The height of the first layer is the most important setting and is adjusted by the TUNE Z-PROBE OFFSET menu.
When clicked, a scale appears for moving the print head relative to the print pad. Positive values cause the printhead to lift above the pad, while negative values bring the printhead closer to the pad. We recommend utilizing maximum caution when approaching the print pad. As a user, you have absolute control over the offset setting. Select UPDATE & STORE to adjust and maintain the offset value for all upcoming prints. If you want to adjust the offset only for the current print, select UPDATE.
Caution: You have absolute control over the printer when decreasing the offset value, so be very careful. We recommend using values -0.05 and -0.01 mm.
Warning: Always monitor the printer when adjusting the offset. Never perform this operation remotely (from another room) or rely on another person’s word or observations.
To adjust the temperature during printing, use the Temperature settings section according to the same system as in the Prepare tab. The Speed factor and Fan speed settings are not usually set manually.
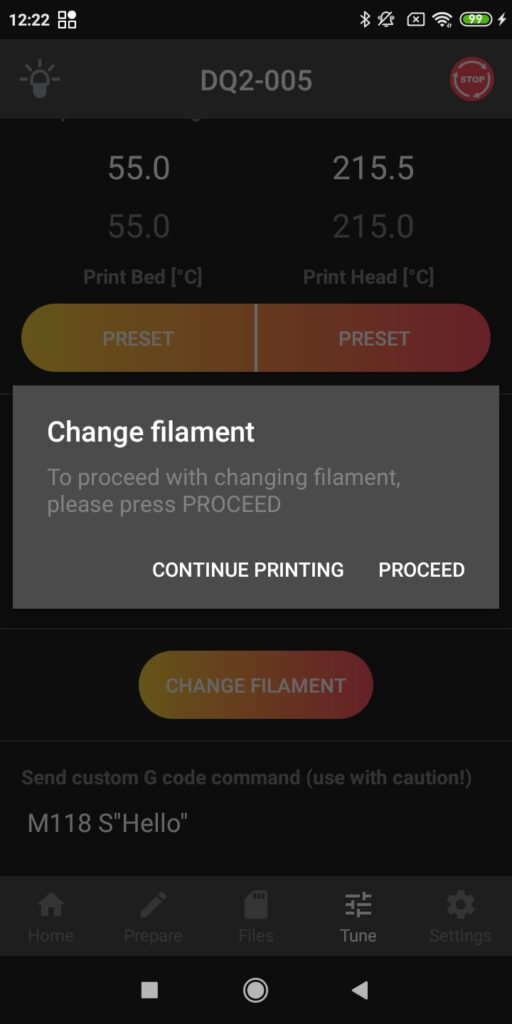
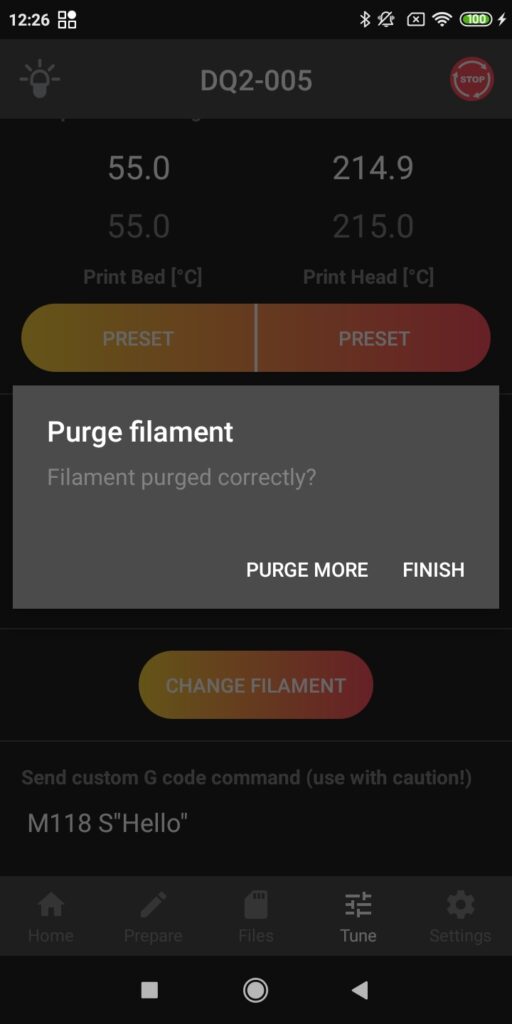
If you need to replace the filament during printing, press the CHANGE FILAMENT button and follow the instructions.
The PrintHead moves above the object and to the rear vertical profile. Then the dialogue tab appears and press the PROCEED button to continue.
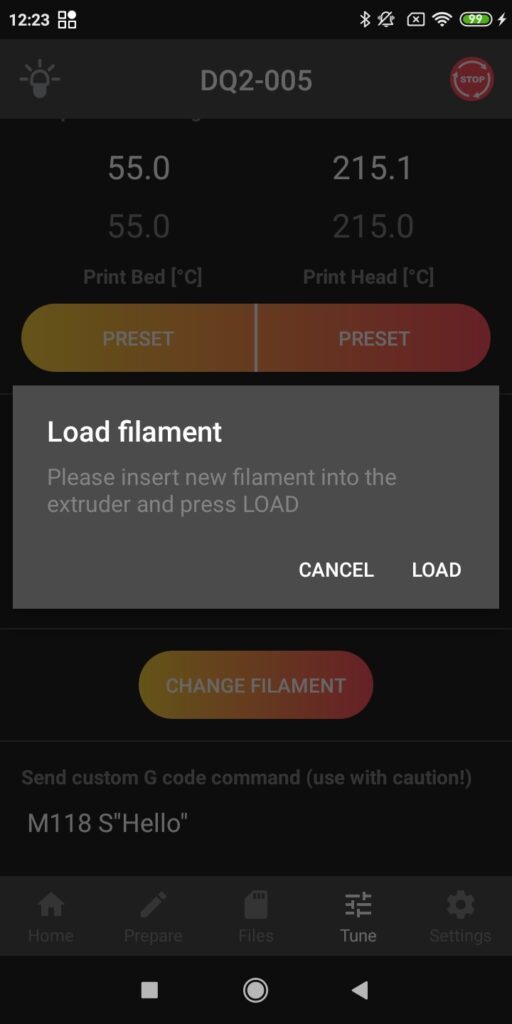
Manually unload the filament and press OK.

Insert the filament approx 1 cm into the bowden and press LOAD.
Filament is loaded into the nozzle. If there is still the old filament coming out of the nozzle, press PURGE MORE. Otherwise continue by clicking FINISH.
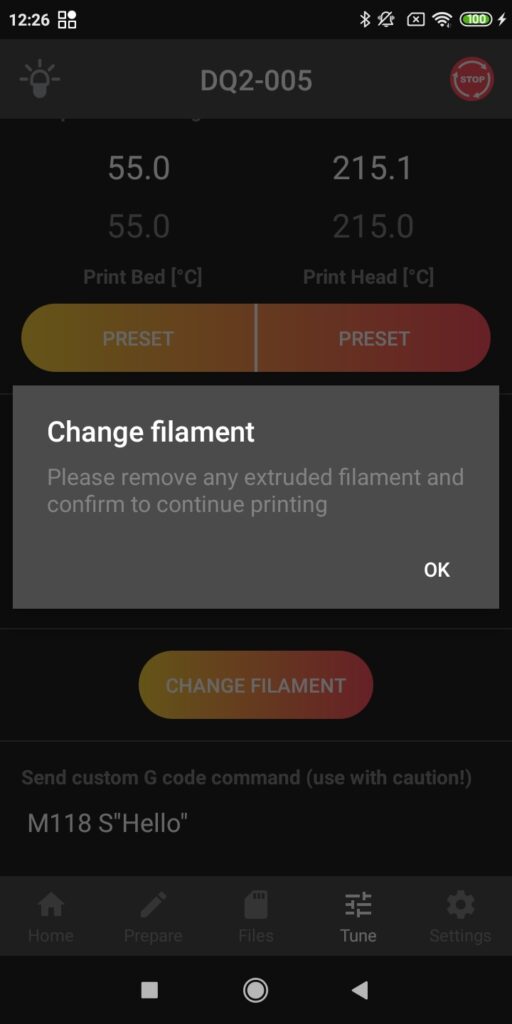
Finally clean all filament from underneath of the nozzle and pressing OK the print will continue.
The last section is for sending Gcode commands, if you know them.

Screen Settings
You can connect the printer to a Wi-Fi network (CONNECT WIFI) in Settings, the last tab of the application or change the mode in which the printer is available. You will also find the IP address that the printer received when connected to your network and through which you can access WebControl in a web browser.
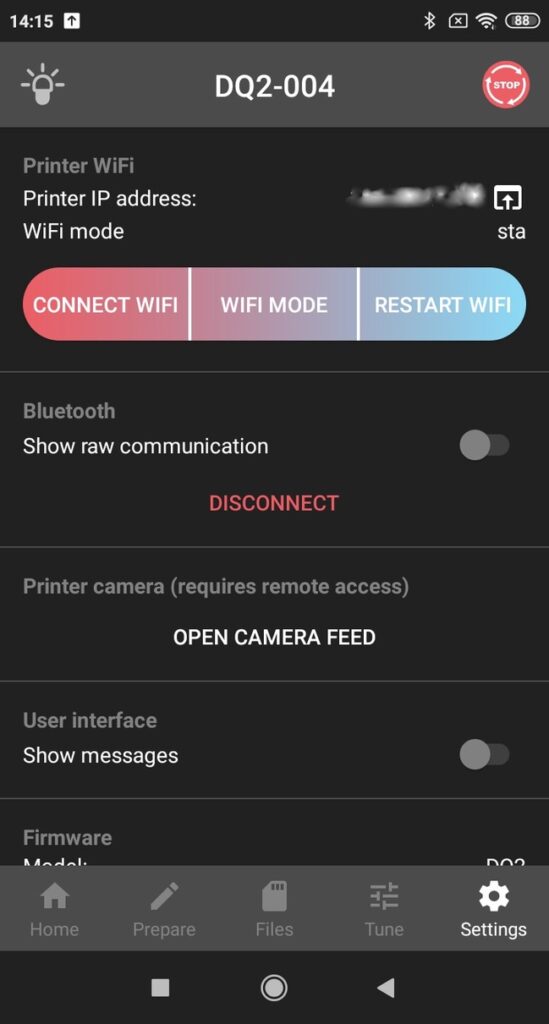
By default, the printer searches for known Wi-Fi networks in the area and tries to connect to them. The Auto and Client modes are used for this. While in Auto mode, the printer will try to connect to the network and then switch to AP mode after a failure. In Client mode, the printer will still try to connect to the network.
If the printer does not find any network or the connection cannot be established, the printer switches to AP mode and allows other devices to connect to it (then it is advisable to enter the password to establish a connection to the corporate network). Choose the network with the same name as your printer’s serial number nad use the password 12345678. In web browser use 10.0.0.5 IP adress. If the WiFi is too weak, use the ethernet adapter and cable for direct connection with your PC (no password needed). For this kind of connection the IP adress is 19.168.1.23
Note: The default password for connecting to the printer in AP mode is 12345678. This password can be changed in the printer’s online interface (as described below).
At the very end you will find information about firmware and application versions that can help you in your communication with service personnel.
DeltaControl updates
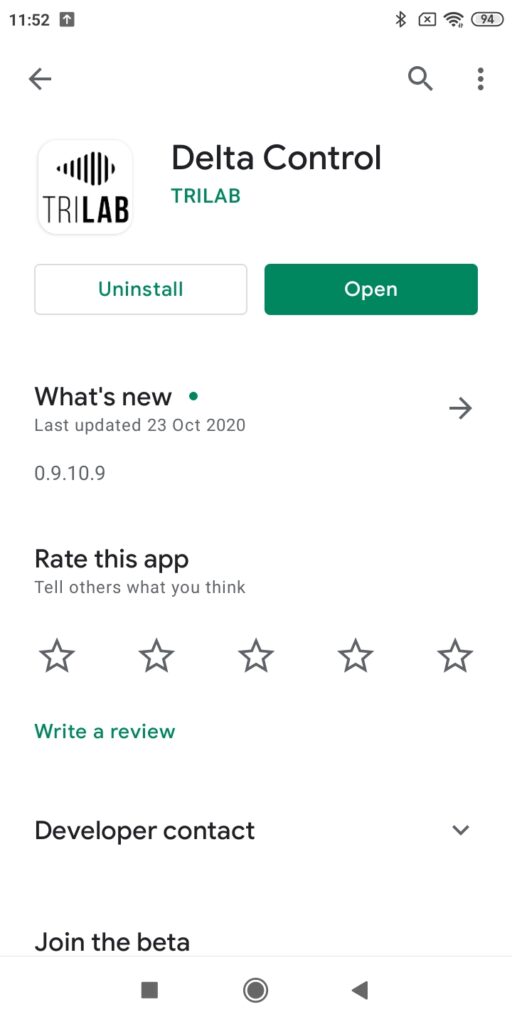
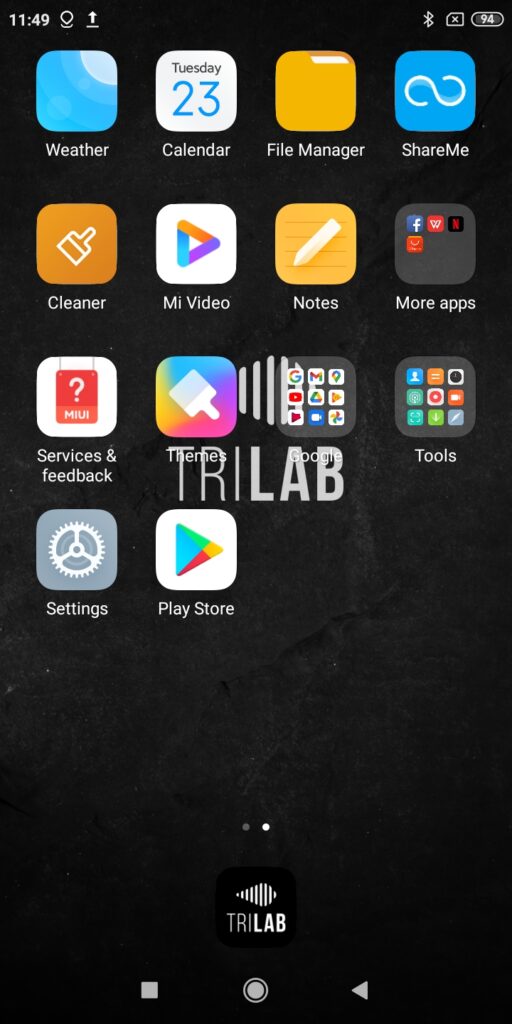
As part of continuous development, updates are provided for the DeltaControl application. Without these updates, the connection to the printer may not work properly. To check/download updates, connect your phone to a Wi-Fi network or a hotspot you have created and select the Play Store application in the DeltaControl display (the application name can also be Google Play or Play Store). it is located below TRILAB in the image below, but location may vary.
Then enter “trilab” into search field and confirm.

Choose te DeltaControl application by TRILAB. It should be on the top of the list.

After clicikng on the DeltaControl application, you will find out whether the application is up to date according to the green button content. If the OPEN is written there, the application is updated. If you see the UPDATE button, updates are available and press it to download them.