
Table of Contents
1) Introduction
2) Printer un-boxing and installation
3) Getting to know your TRILAB DeltiQ 2 printer
4) Making your first DeltiQ 2 print
5) Cheat sheet – standard printing procedure
6) How to use the DeltaControl display and application
7) How to use the WebControl online interface
8) Installing the printer on your own
9) Printer service procedures
1) Printer start…. 2) Load filament…. 3) Printpad position………………… 4) Printpad preparation…. 5) Test print…. 6) Print detach…………….. ….7) Colling off…. 8) Turning off
First, let’s review what you’ve already completed. (Most of the steps were performed by our technicians).
- The printer is unpacked and sits on a solid desk
- Individual components of the printer (such as the extruder and display) are installed and connected
- The DeltaControl display is paired with the printer.
- The printer is connected to a computer network (or working in AP mode)
First, you will learn how to print a test model that is already uploaded to printer’s memory by default; no need to plan it yourself. To print this sample model, you’ll need to do the following:
- Start the printer
- Load the filament into the printer
- Properly place PrintPad
- Prepare the PrintPad
- Begin printing
Starting the printer
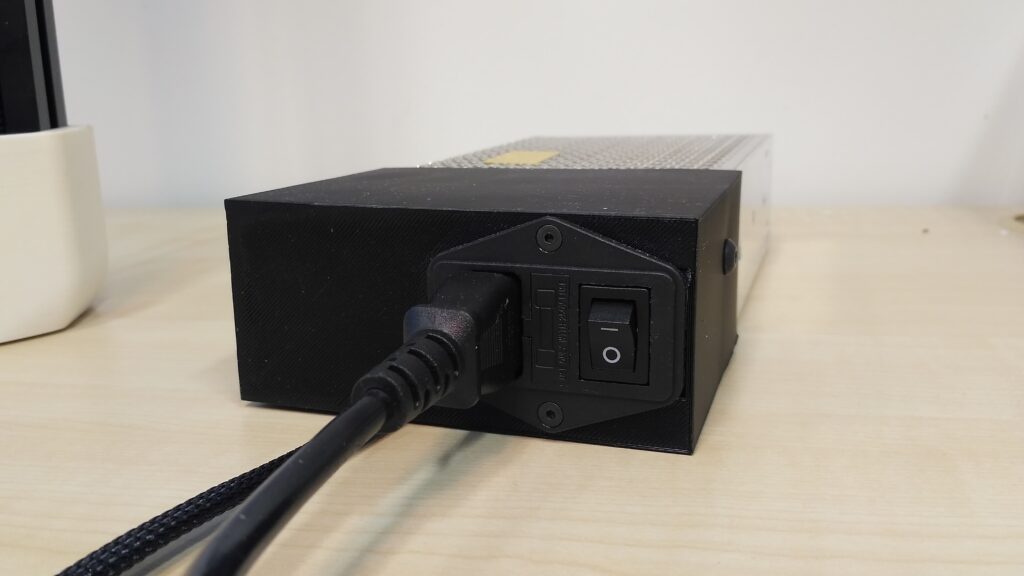
Before starting the printer, make sure that both the power source cord and the printer power cord are properly connected.
If you have a cable between the power socket and the power supply, it will be a standard three-conductor cable with a standard connector common with computer sources. Slide it all the way into the source
Before connecting the cable to the printer, make sure that the rocker switch on the power supply is in the off position.
The power cable from the power supply to the printer has a coaxial (barrel) connector. This connector cannot be plugged in fully, the outer metal part will still be visible even after a proper connection. You will hear two “clicks” while plugging in. The connector should be firmly connected to the printer body and should not wiggle.
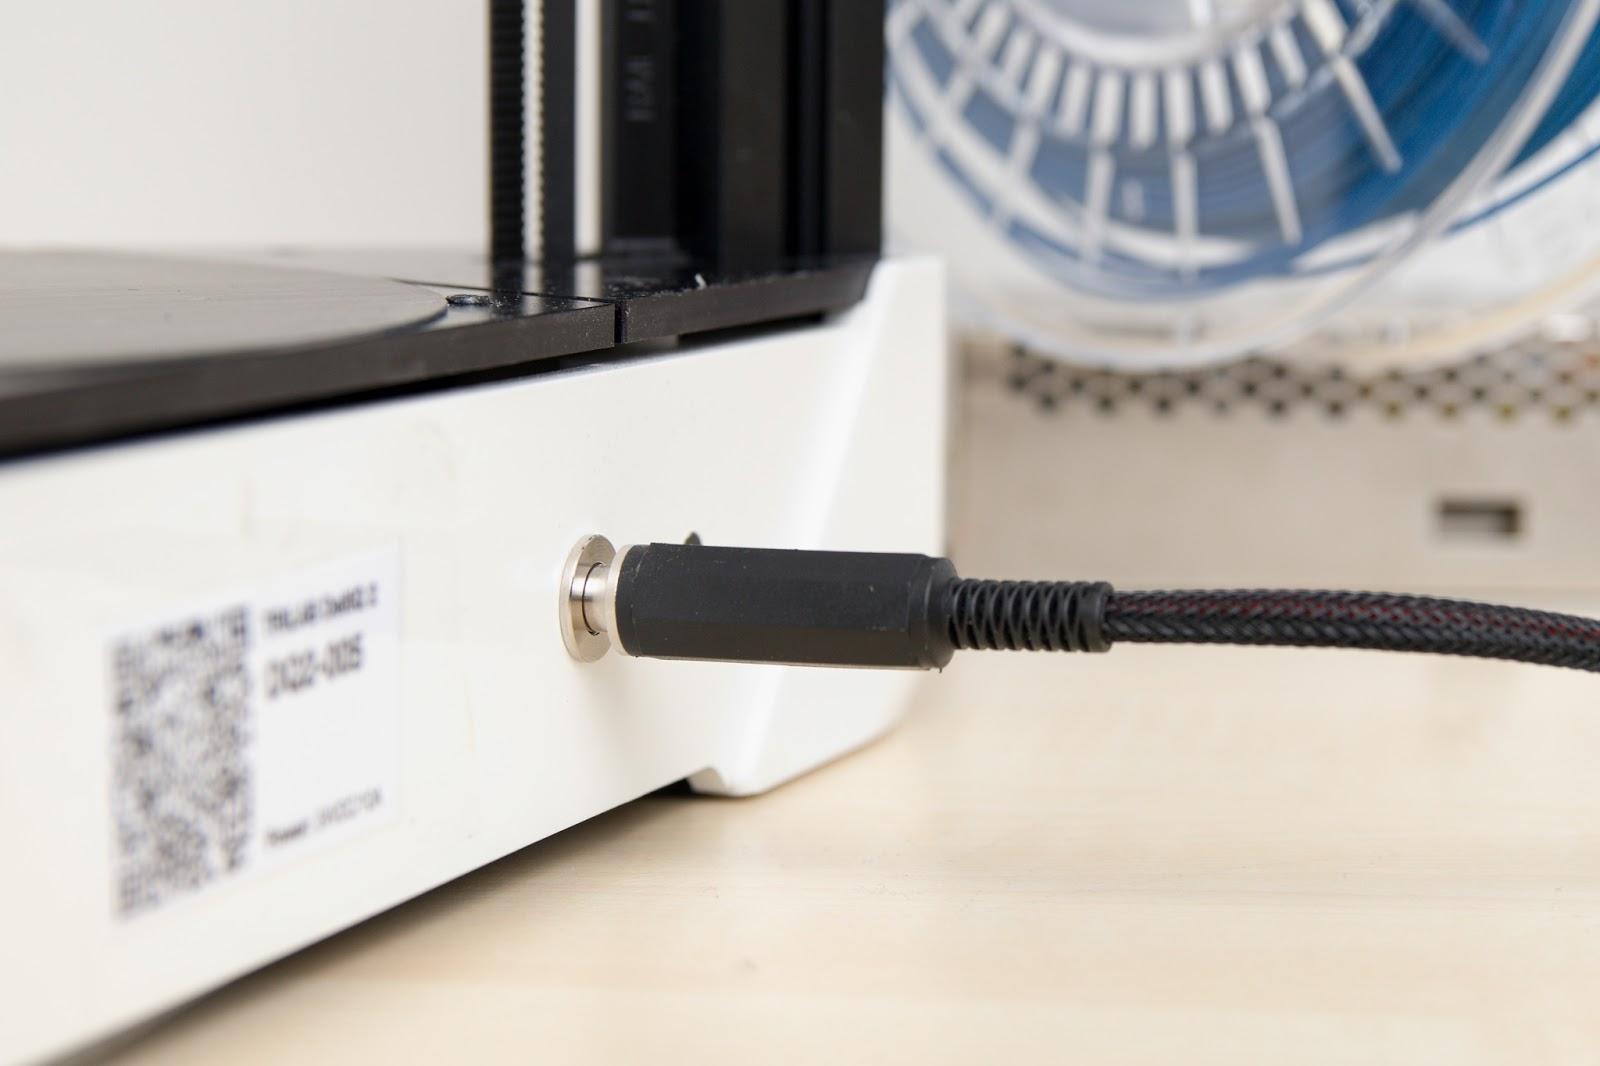
Caution: Do not bend or twist the power cord from the power supply to the printer unnecessarily nor tie it with quick-release straps.
To turn on the printer, push the rocker switch on the AC adapter. You’ll know the printer has successfully started and is ready for the next task via a white colored diode on top of the printer.
If you do not currently have the DeltaControl display turned on, do it now. You’ll find the DeltaControl app on the Android home screen, click to launch it.
Caution: The default display lock code is 2580. If you need additional security from other users’ accessing the printer, change the code in the Android OS menu.
Loading the printer filament
Because you should use the Titan extruder for the test print, the following procedure describes how to load the filament into the Titan extruder.
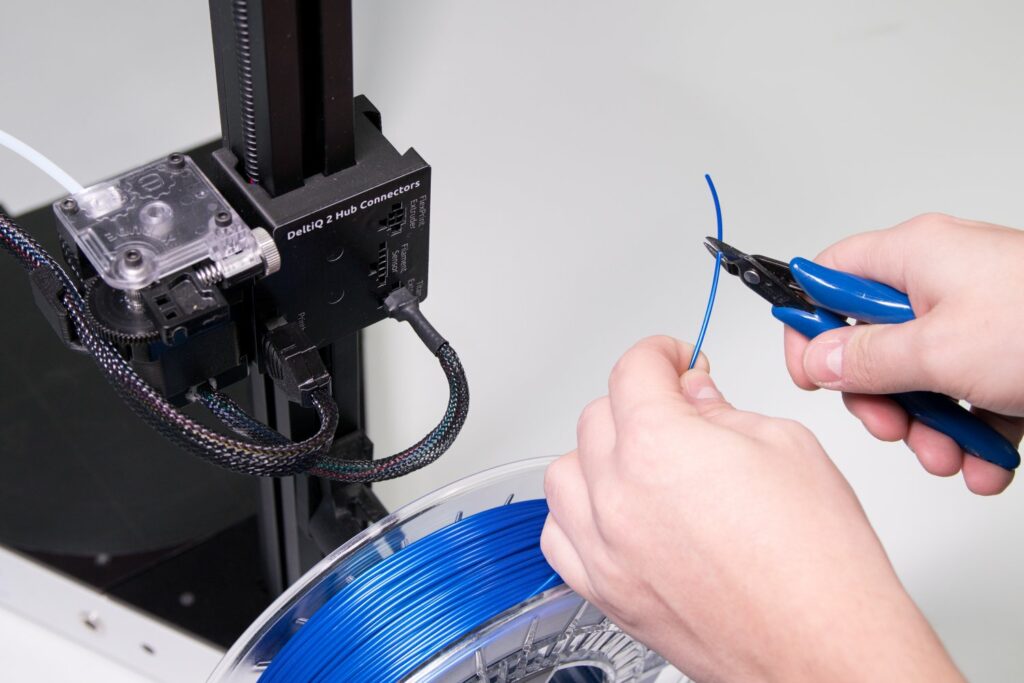
- Remove the filament spool from its packaging and place it on the holder at the back of the printer. The end of the string should still be firmly fixed in place.
- Then, unfasten the end of the filament from the side of the spool. Using the supplied pliers, cut the end of the filament at a 45° angle. Remember to always hold the freed end of the filament in your hand.
- Using your index finger and the thumb of your other hand, press the marked positions on the Titan extruder against each other. This allows you to easily load the filament around the feeder wheel.
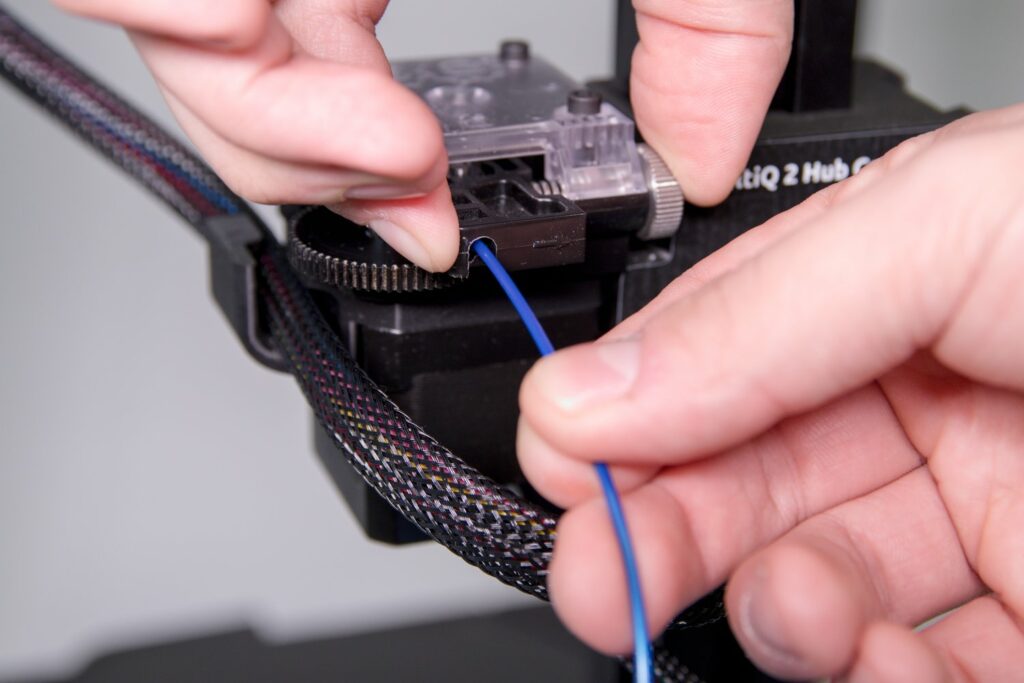
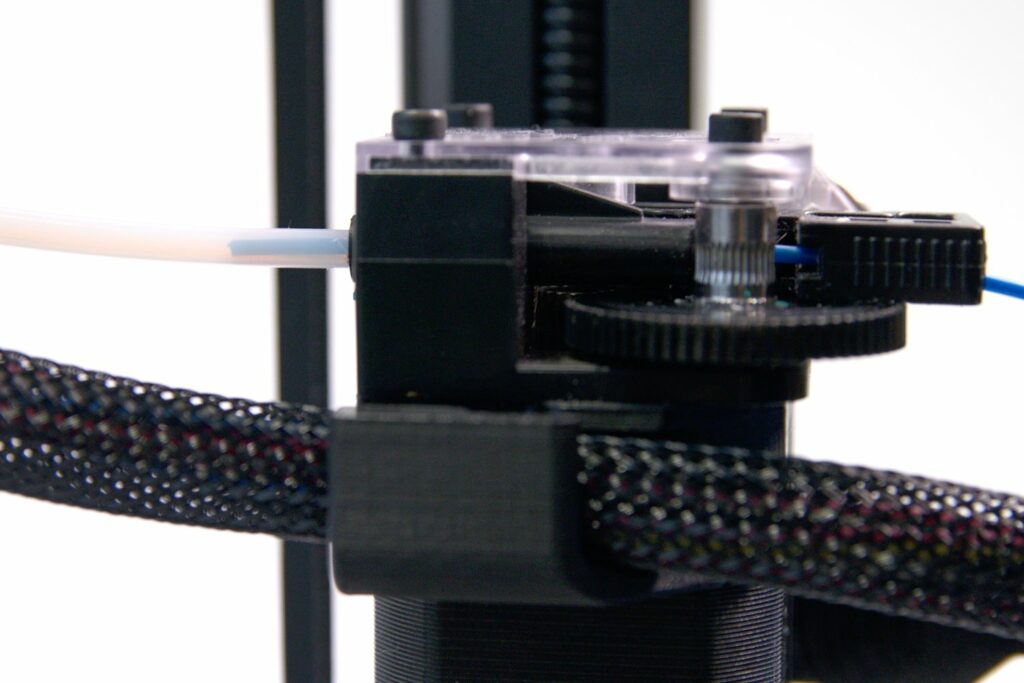
- If your package includes a filament sensor, feed the end of the filament through the filament sensor to the extruder. If this sensor was not included, feed the end of the filament directly into the extruder.
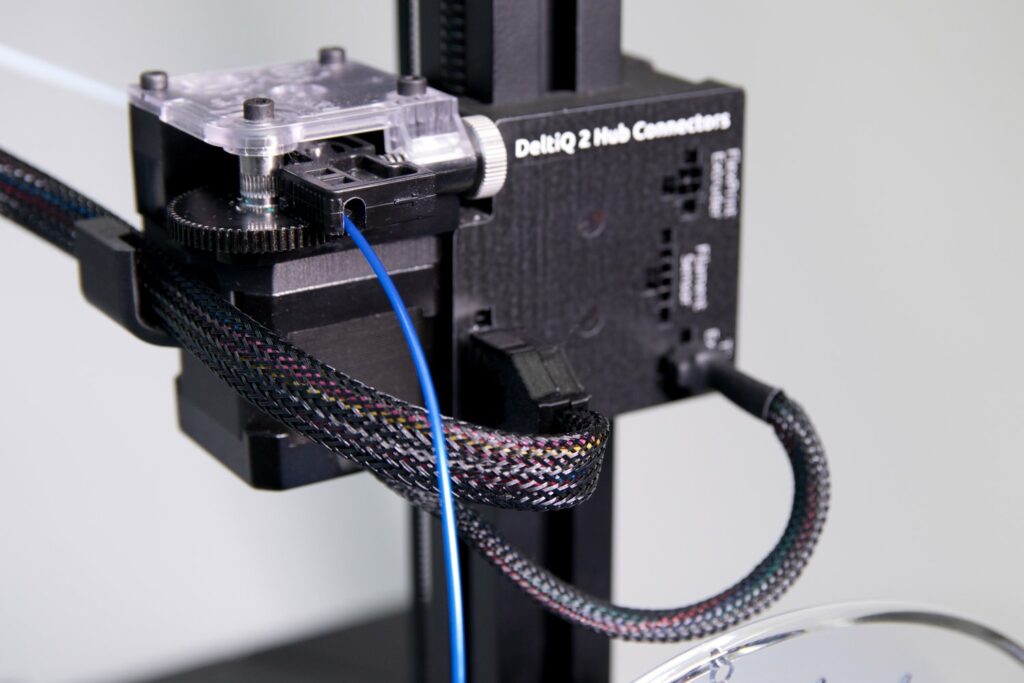
- The end of the filament will appear in a transparent bowden duct after the extruder. When you see about a centimeter of filament in the tube, release the second-hand grip, the filament is ready to be loaded using the printer control.
- Have the DeltaControl display ready in-hand and select the Prepare tab, make sure the Titan is highlited and press the LOAD FILAMENT option.
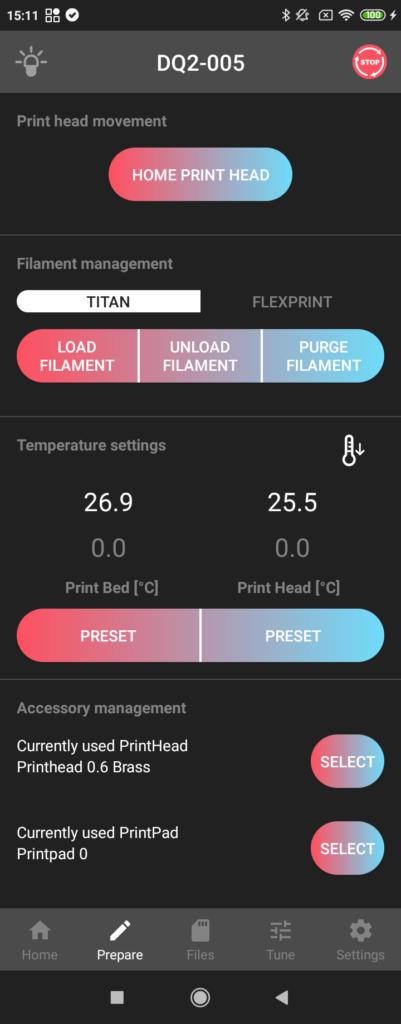
- The printer will start to heat up (the status LED turns yellow).
- After warming up, the filament will be drawn automatically into the hot end and the nozzle will be cleaned of any previous filament.
- To prevent the filament from leaking through the nozzle, click on the thermometer icon on the page Prepare. This will turn off the heating and cool it down to room temperature.
- Before the hot end cools down, remove the spilled filament from the pad and nozzle to avoid contamination of the subsequent print.
Caution: If you let the hot end cool down to room temperature, the string will stiffen and will become more difficult to separate.
Proper PrintPad placement
The TRILAB DeltiQ 2 uses interchangeable PrintPad sheets. These are steel plates with a special surface treatment, which are magnetically attached to the heated mat.
Warning: Never print without the PrintPad in place as the printer could be damaged.
Two screw heads on the back of the printer will help you with placing the PrintPad correctly. The PrintPad must touch these screw heads but can not be placed on them as it would not adhere perfectly to the heated mat.
We recommend the following steps to properly place the PrintPad:
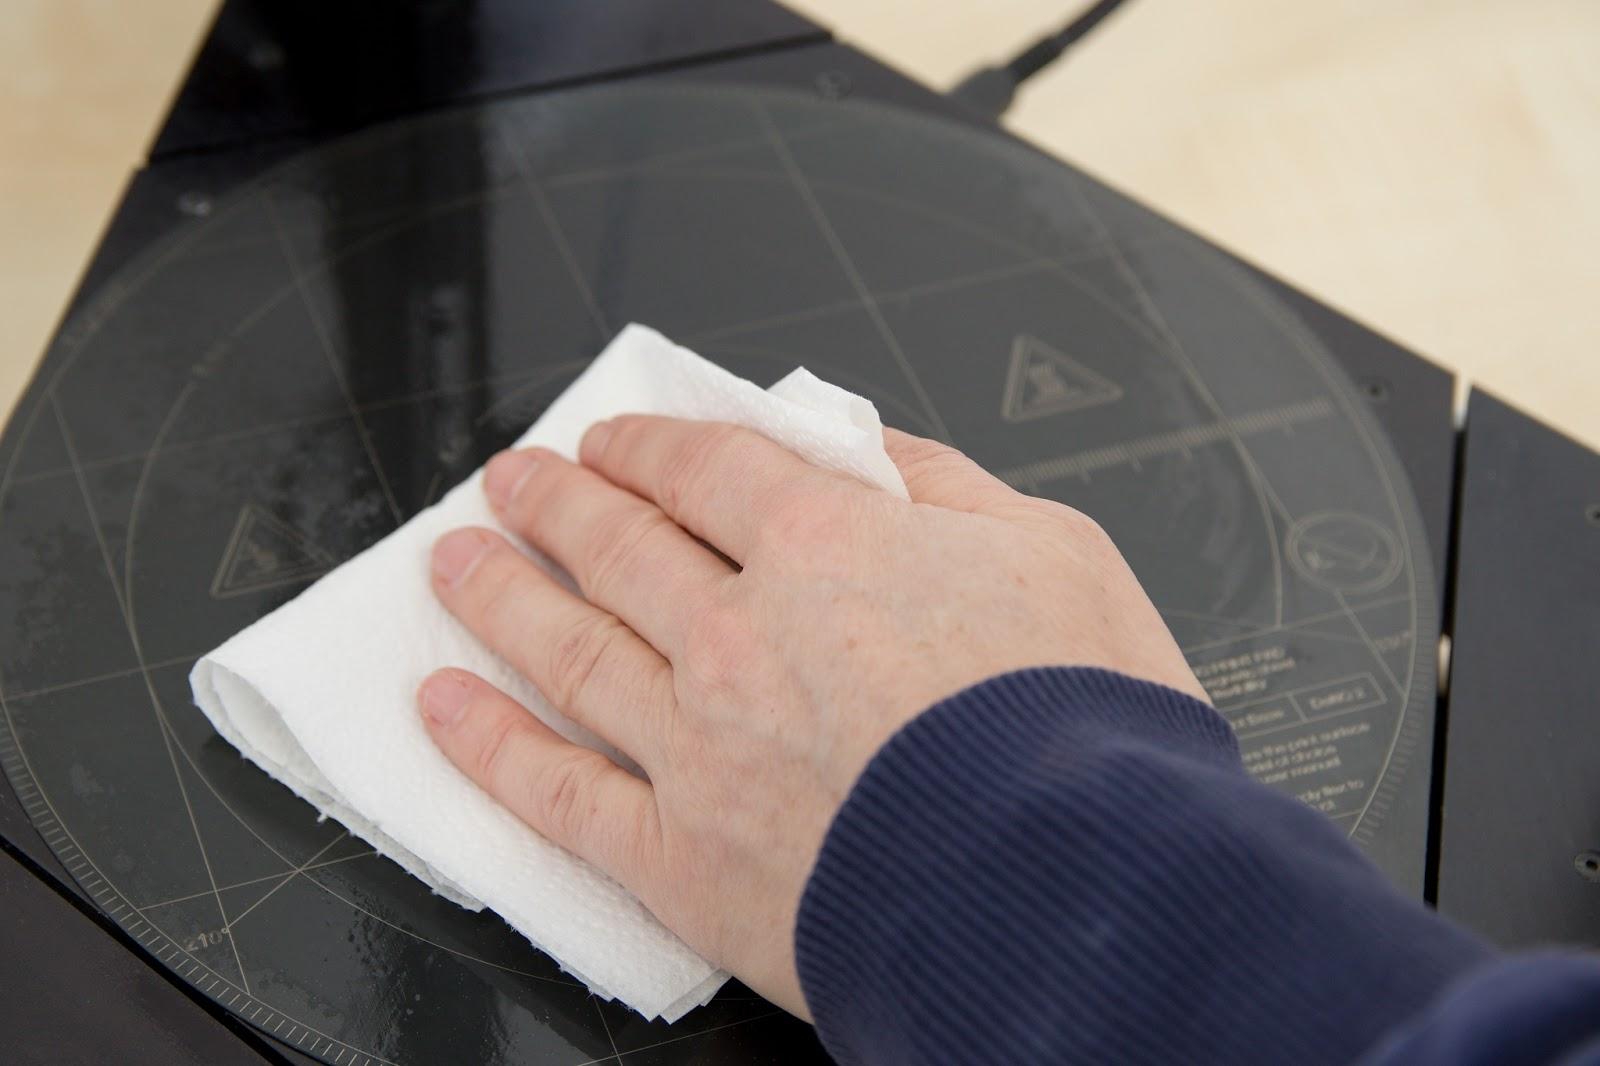
- Clean both the PrintPad and mat
Caution: Any kind of debris will disturb the placement in the plane, i.e. there must be no dirt on the surface and between the heated pad and the PrintPad
- Place the PrintPad at an angle of about 30 ° to the left rear screw head (make sure the magnets in the pad do not react to the steel PrintPad).
- Adjust the position of the PrintPad so that it fits against the other screw head.
- Place the fixed PrintPad onto the pad, it will be attracted to the magnet.

Tip: Don’t worry about the PrintPad being slightly rotated. This has no effect on function.
Preparing the PrintPad
The PrintPad, supplied with the printer, is coated with a thin layer of PEI, which has ideal properties for most print materials. However, you need to prepare the PrintPad before printing and that depends on the type of material you will be printing with.
For PLA and similar materials, degrease the PrintPad with an isopropylalcohol spray application onto the PrintPad. The pad should not be heated, as the alcohol would then evaporate quickly. Wipe with a clean paper towel (ordinary kitchen paper towels or handkerchiefs are fine).
Tip: Do not underestimate the importance of this cleaning procedure before each print. The PEI print surface is versatile and very durable, but very sensitive to grease or debris on its surface. If the surface is not cleaned properly, problems with reduced material adhesion will most likely occur.

Follow the same cleaning procedure when printing with ABS and other similar materials.
For PETG and similar materials (eg CPE), also degrease, but apply a window cleaner to PrintPad afterwards and spread it gently to form a thin and even layer on the PrintPad.
Caution: If you do not apply a window cleaner to these materials, the finished printout and PrintPad will become greatly adhered to each other. Removing it will then put unnecessary strain on PrintPad and can cause damage.
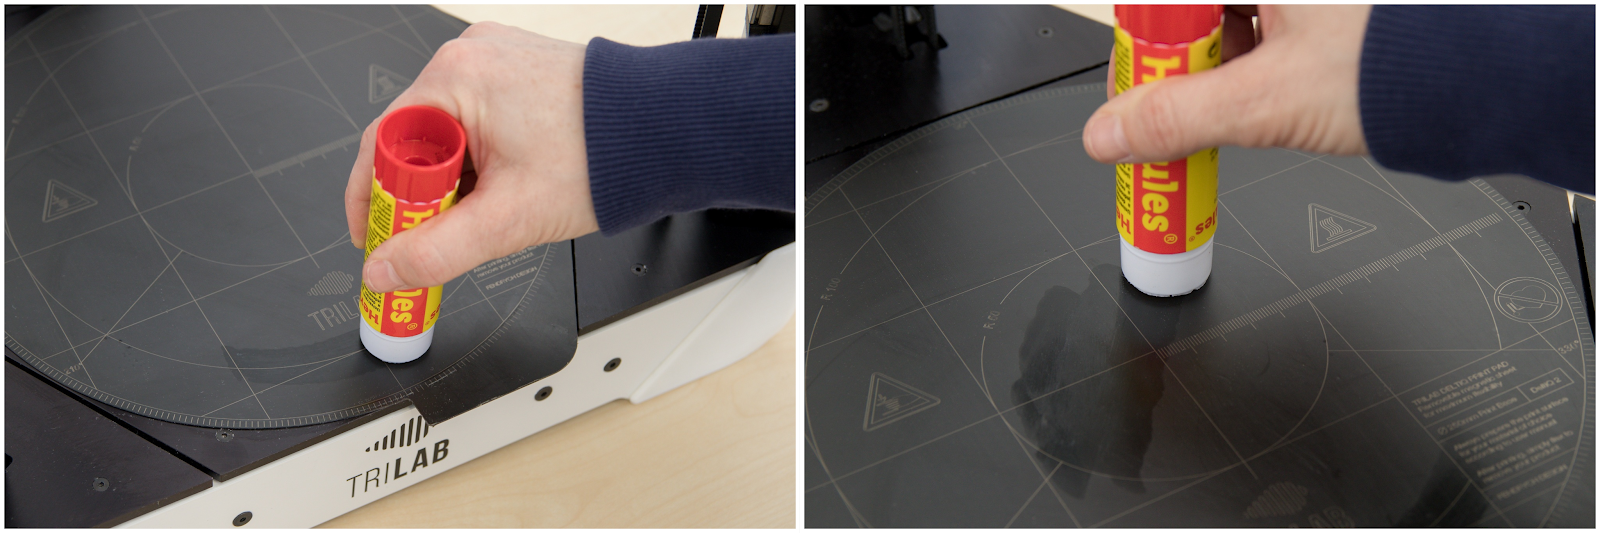
When printing flexible materials on the TPU basis, the PrintPad must be treated with one even layer of office paper glue. It is sufficient to apply a thin film. Lumps or any additional glue should not be visible after applying an application.
Tip: We recommend using a Tesa Easy Stick (supplied in the triangular packaging), UHU Stic or Hercules. In addition to the flexible material that allows the model to be removed from PrintPad, it is also very practical for printing nylon materials, where on the contrary, increases their adhesion to the backing and makes printing easier.
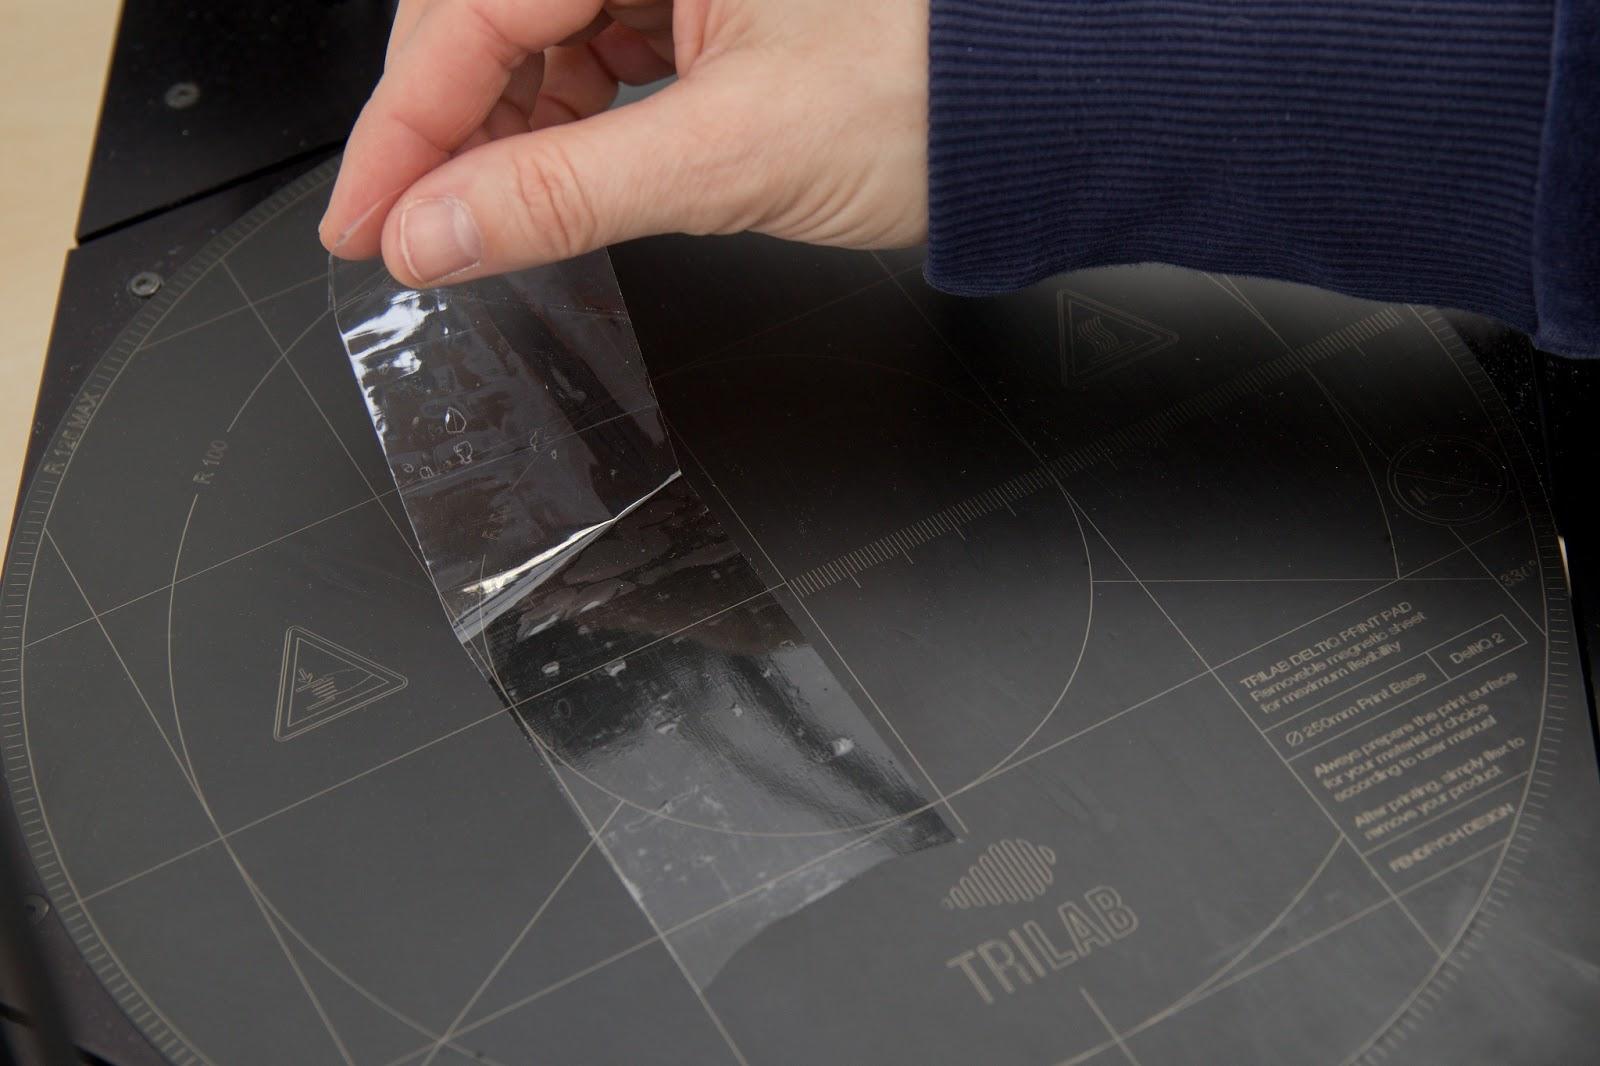
In the case of printing flexible materials on the TPE basis, we recommend that you place transparent adhesive tape over the projected print area.
Warning: Never print directly on the mat or apply any of the previously mentioned procedures onto it.

Starting a test print
Use one of the default models stored in the printer memory for the first printout. These models have been prepared for printing by our specialists and the G-code has been optimized for your printer. Afterwards you will easily see if your printer is set up correctly.
The easiest way to start printing is to use the DeltaControl display. In the Files tab, you will find ready-to-print models, such as the DQ2_3DBenchy.gcode, a boat model that tests many of the print parameters such as: the ability to print overhangs through dimensional accuracy to the ability to print details. This model takes about 80 minutes to print.

To print, click the file name and confirm.

When printing is initiated, the status LED turns blue (printing in progress) and the printer begins to heat the pad. If the nozle is heated to more than 50°C, the sideblower will automatically cool the nozzle. The first visually recognizable activity will be the calibration of 13 calibration points (the printer’s head slides over the pad) and then the auto leveling sequence (automatic comparison of the printing plane according to the minor imperfections of the pad and the PrintPad). After performing these automatic operations, the print head will move forward to the left profile and begin to heat the nozzle. After the nozzle heats up, it performs an initial flush and will then automatically proceed with printing the model.
Printing the first layer is a very important moment and therefore we recommend not leaving until the entire first layer is finished. The filament you have chosen might need to adjust the height of the first layer. This setting can be found in the Tune tab of DeltaControl. See the section Adjusting firt layer height of chapter Installing the printer on your own for more information.
Removing the printout
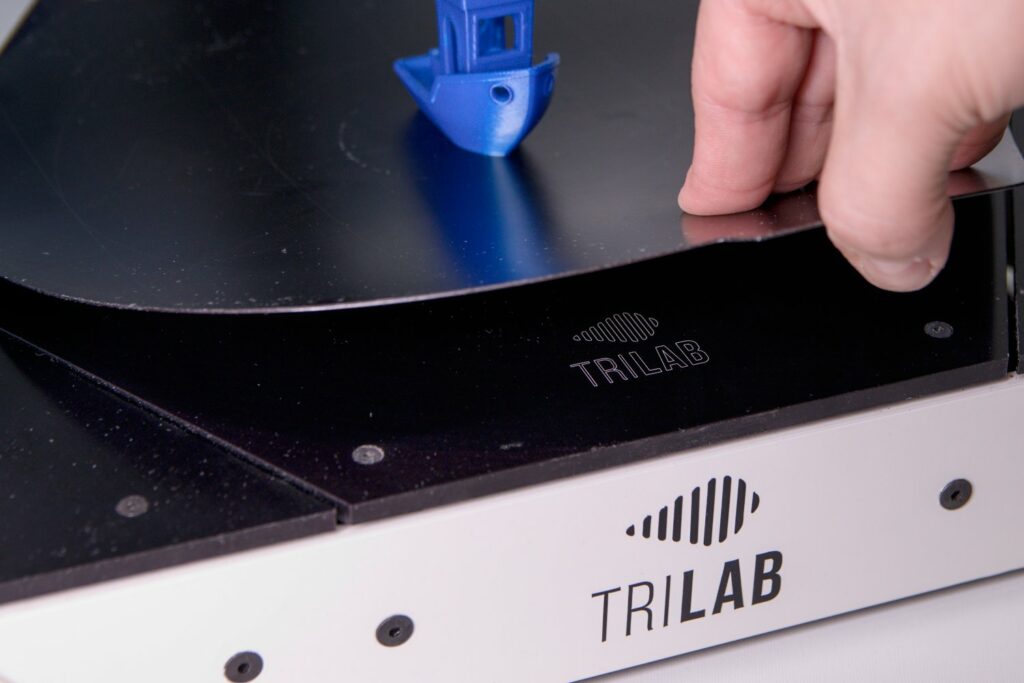
Congratulations on your first print, we’re sure it turned out great! Now you have two options to remove the printout.
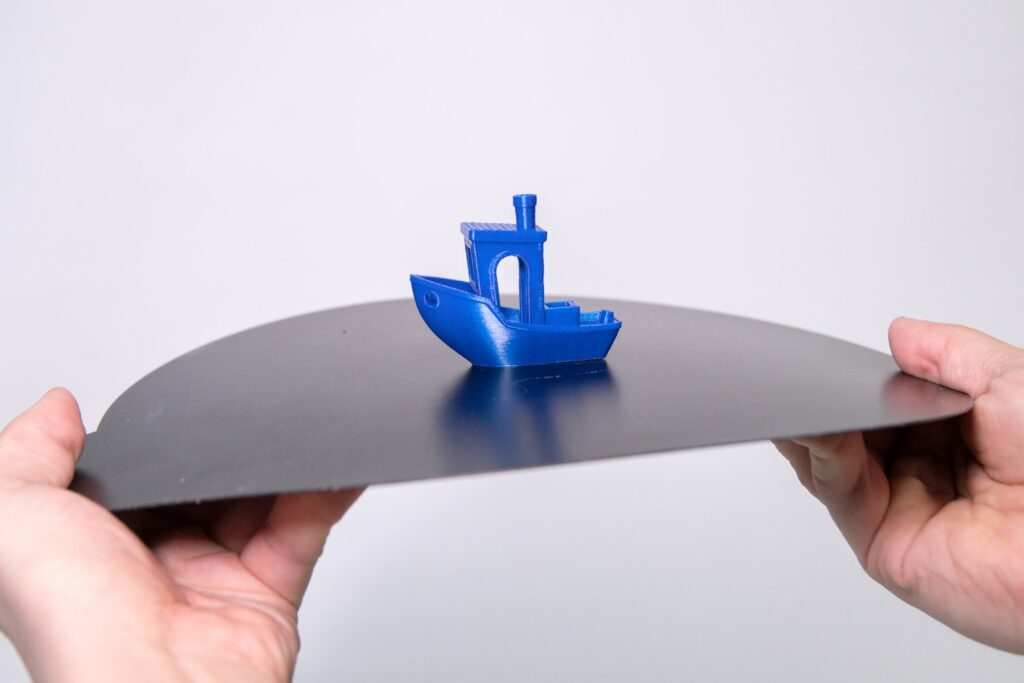
- Remove the entire PrintPad by lifting it in the front, remove it from the printer, and gently flex the plate to separate the print from the pad.
2. Use the supplied spatula. Place the spatula with one side on the PrintPad. Do not be afraid to push down on the spatula with your finger, bend it and move it as parallel as possible to the mat. Then run the spatula under the printout to separate it.
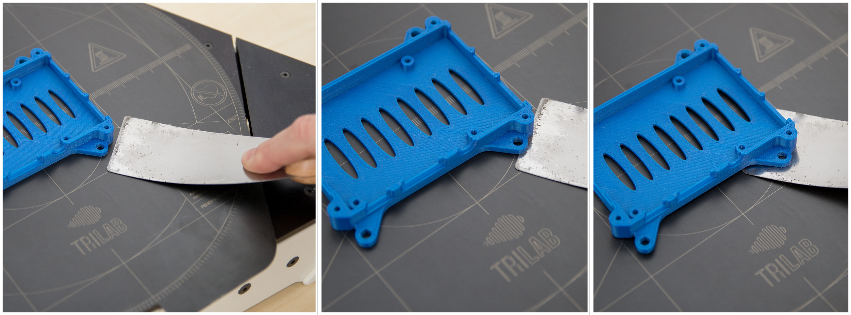
Tip: If your printed object has corners or sharp edges, this is the optimal place to slide the spatula under. Conversely, the round parts of the models are less suitable.
Cooling the hotend
Before start of another print the PrintHead needs to be cooled under 50°C. If you start the print too early, the side blower turns on. When it reaches 50°C, side blower turns off and print starts. Till this moment the LED diode is blue-white blinking.
Caution: Turning the printer off before the hot end cools may cause the filament passage to clog up. In particular, the PLA material is already pliable at 60 ° C.
Turning off the printer
Do not turn off the printer if the nozzle temperature is above 50°C. Turn the printer off in the same way you turned it on by turning the power switch on the source.

Caution: If you turn the printer off (rocker switch on the power supply) and will not be using it for an extended period of time, you should also turn off the DeltaControl display. This will prevent any problems with the phone battery.