
- Introduction – before you start using the printer
- Unpacking and installing the printer
- Getting to know the TRILAB AzteQ printer
- First printing with your AzteQ printer
- Cheat sheat – the usual printing procedure
- How to use the DeltaControl display and application
- How to use the WebControl online interface
- Printer self-installation
- Service tasks on the printer
Subchapters
1) General…..2) Home…..3) Preparation…..4) Printing
5) Fine-tuning…..6) Settings…..7) Updates
The DeltaControl panel function is provided by a smartphone with the DeltaControl application installed. The smartphone is located in the charging dock on the printer frame.
If the phone has been off and is then turned on again, it is necessary to relaunch the DeltaControl application by tapping the icon.
Note: We do NOT recommend using the DeltaControl device as your personal smartphone. If the system is modified or if other applications are installed, smooth running of the DeltaControl app cannot be guaranteed.
Note: If you turn the printer off (using the rocker switch) and you know it will not be used for a longer period of time, you should turn off the DeltaControl display as well. That will prevent any problems related to the telephone battery.
1) General description of the DeltaControl environment
After DeltaControl is launched, a list of paired printers is displayed. Click on the printer you want to control.
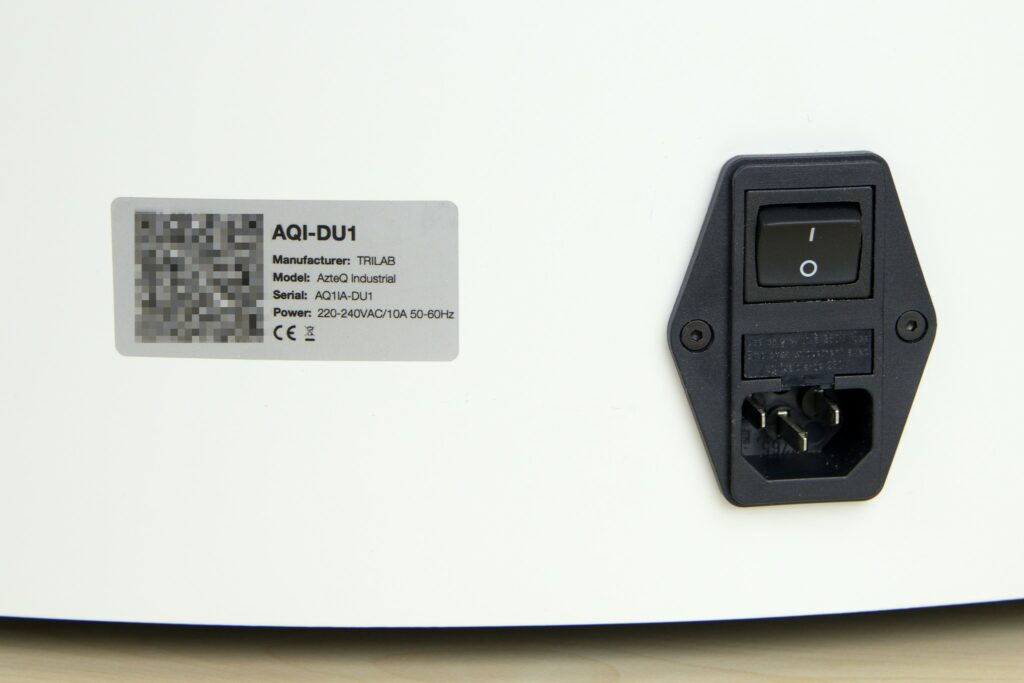
You can add more printers on this initial screen. After pressing ADD PRINTER button, the camera is turned on to scan the QR code. The code is located in the back part of the printer, near the power supply cable.
After scanning the QR code, you can rename the printer and tap the ADD PRINTER button to add it to your list.
2) Home screen
Once the printer is selected, it is connected to the device. The environment of the application is divided into tabs in the lower part. The Home screen includes a basic overview of the machine status.
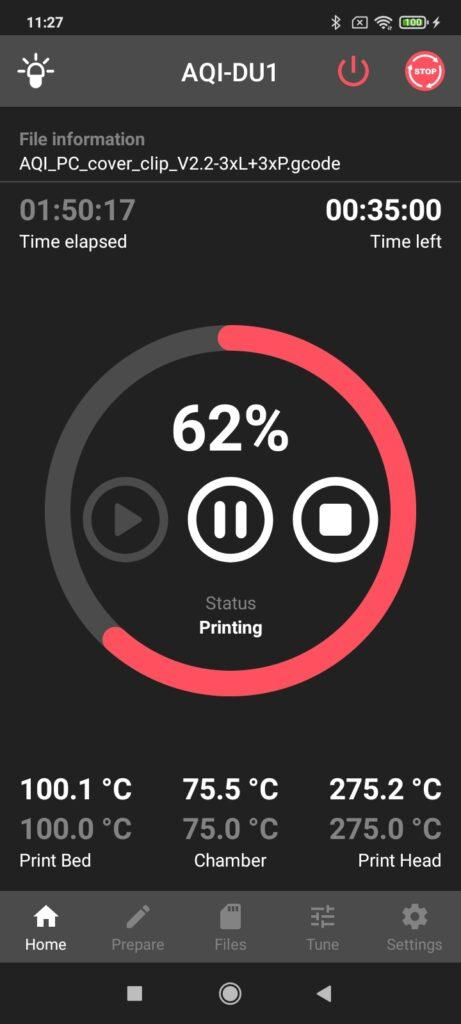
At the top there is a common line for all tabs. On the left there is an icon for turning on/off the lights, in the middle is the name of your printer and in the right-hand corner you can see the EMERGENCY STOP button, which you can use to stop the machine while printing is in progress. The printer is then restarted and after a short time it is prepared for other tasks. By pressing this button, the printing in progress is stopped and it is not possible to continue it later.
The activation of this button must be confirmed in the next dialogue window. This is a measure preventing the printing from being stopped accidentally. To confirm the emergency stop, press CONFIRM.
Tip: If you need to stop an action in progress as fast as possible, use the red button bellow DeltaControl display.
File information , under the common line, shows the path to the printing task assigned. The following time indicators show how much time has elapsed (Time elapsed) and how much time is left (Time left).
The largest part on the home tab shows printing progress. The red circular indicator and the numerical figure show printing progress percentage. Then there are three buttons for pausing (Pause), stopping (Stop) and continuing (Play) the printing. The last item in this section is the status indicator.
The last items are temperature indicators for the bed (Print Bed), chamber (Chamber) and print head (Print Head), where the upper figure is the current temperature while the lower figure is the required temperature.
Clicking on any temperature figure takes you to temperature settings in the next parts of the application.
To move between the individual parts, use the tabs in the lower part of the application.
3) Prepare screen
The Prepare screen is used for entering several usual commands related to print preparation.
The HOME PRINT HEAD button is used for putting the print head in the initial position (e.g. after printing is stopped).
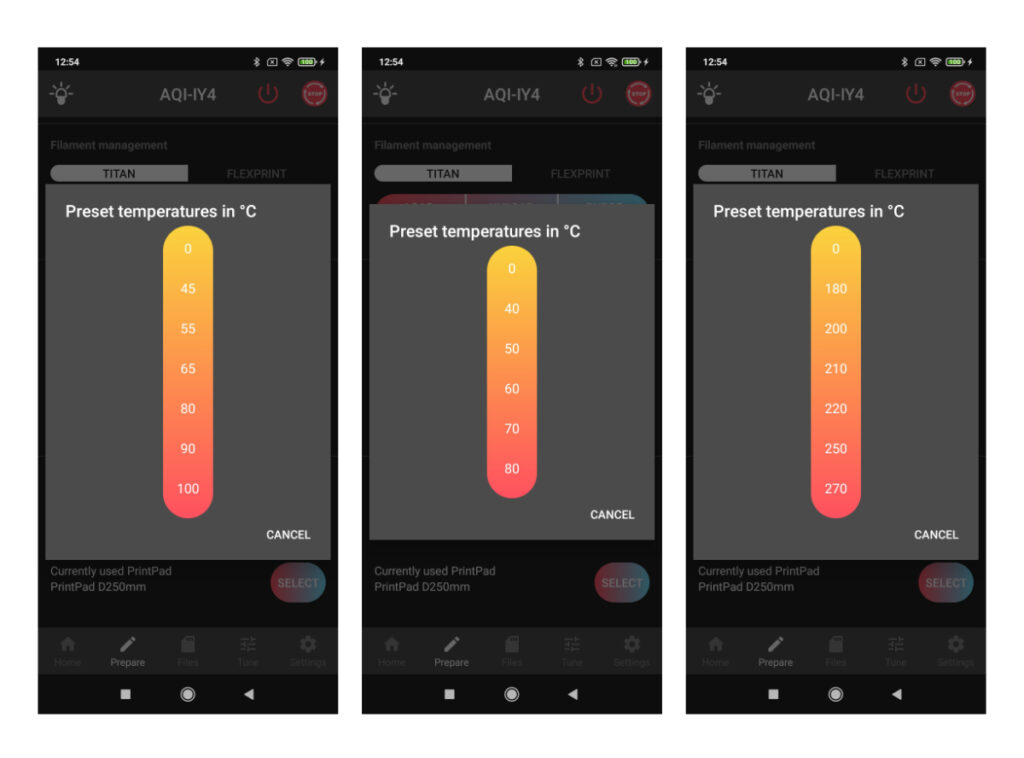
Filament management includes buttons controlling the filament loading into the print head using the Titan extruder. LOAD FILAMENT provides heating up the nozzle to 250 °C and loading filament into the print head. UNLOAD FILAMENT is the exact opposite: the nozzle is heated and the filament unloaded. If the nozzle must be cleaned due to a different type of material or significantly different colour being loaded, we recommend rinsing the nozzle with the loaded filament using the PURGE FILAMENT button.
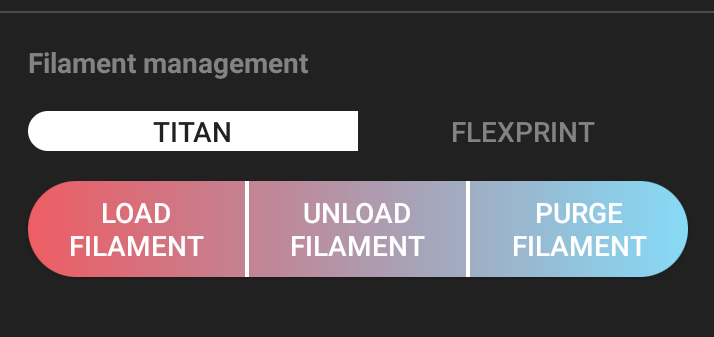
Note: If you are loading filament whose melting temperature is higher than 250 °C, set the required temperature manually (see the instructions 2 paragraphs below) and then select the macro command.
In the next part of the screen, Temperature settings, you can set the temperatures of the print bed (Print Bed), closed chamber (Chamber) and print head (Print Head) manually (by clicking on the grey temperature value). The working temperature setting is part of the G-code generated by the software (slicer). To turn off the heating use the thermometer button with the down arrow.
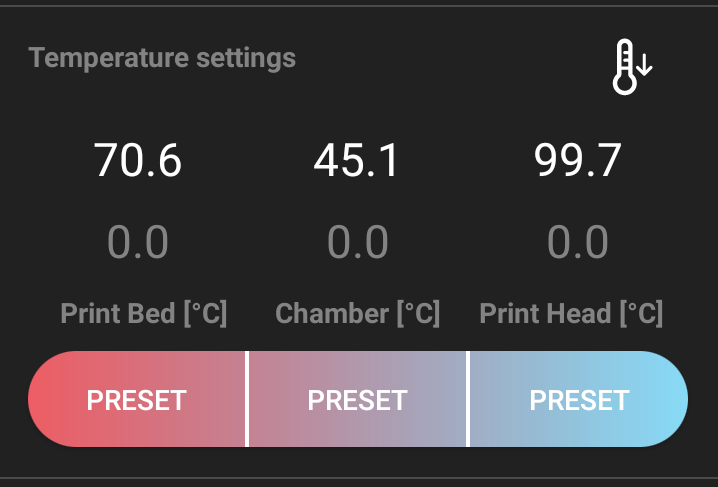
After tapping one of the PRESET buttons you can choose from the most frequently used pre-set temperature figures (the scale goes from the left for bed, chamber and print head temperatures).
For easier management and setting of multiple print pads and print heads, use Accessory management. For each new print head and print pad you get a configuration file which you need to load into the printer memory through the web interface (for detailed instructions, see Accesories)
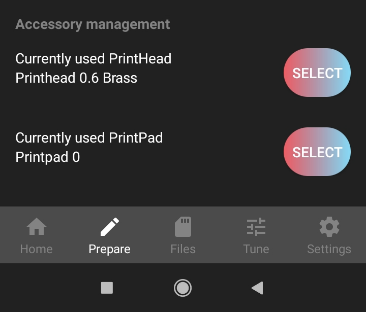
If you want to use the accessories, replace it according to the instructions (How to replace the print head) and use the SELECT button to choose the accessories from the list. After each such change, the pre-set figures (e.g. offset) of the accessories are loaded and automatic calibration is done before the next printing session.

After the first such change, offset is set to 0.0mm. Therefore it is necessary to fine-tune the Height of the first layer during the first use of the new accessories.
If you have more print heads, you can use them alternately, e.g. according to different nozzle size or type. This simplifies the preparation process and eliminates the risk of damage during nozzle replacement procedure.
4) Files screen
This tab contains the list of prepared printing data in the printer’s internal memory (where the data can be uploaded via the online interface) or from a USB device (switch to the USB device in the screen header).
Launch the printing of the selected item by tapping the file name and then the Print button.
If you have the required file on a USB disk, press Print to copy the file into the cache – printing will start once the copying is completed.
You can remove the USB disk during the printing without affecting the printing process in any way. Once the printing is completed, the file is stored in Internal->USB file.
5) Tune screen
This part is used for manual fine-tuning of the printer and setting certain values during the printing. The most important setting, the height of the first layer, can be fine-tuned in TUNE Z-PROBE OFFSET.
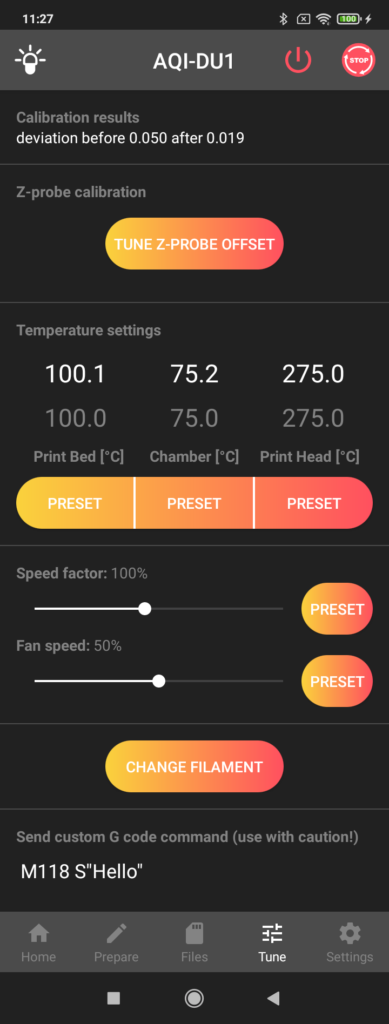
After clicking on it, a scale for shifting the print head in relation to the printpad is shown. Positive figures cause the print head to move higher above the printpad while negative values cause it to move closer. Every adjustment is made immediately after clicking on any figure. It is advisable to proceed with maximum caution when moving the head closer to the printpad. As a user, you have absolute control over offset settings. To adjust and save the offset figures for all upcoming printing tasks, select UPDATE & STORE. If you want to adjust offset only for the printing task in progress, select UPDATE.
Note: When decreasing the offset value, you have absolute control over the printer, so you must proceed very carefully. We recommend using values -0.05 and -0.01 mm.
Warning: Always make sure the printer is under your control when you are adjusting offset. Never do this action remotely (from another room) or based on information from another person.
To adjust temperatures during printing, use the Temperature settings according to the same principle as on the Prepare page. Neither the speed factor nor the fan speed is usually set manually.
If you need to change the filament during a printing job, press CHANGE FILAMENT and follow the instructions.
The print head moves forward and up from the model. Then a dialogue window appears – press PROCEED to continue.
After that you must remove the rest of the filament manually and continue by pressing OK.
Insert the new filament in the extruder so that there is about 1cm of the filament in the Bowden and press LOAD.
Now the filament is loaded into the nozzle and the material is also purged. If you can see that the purging was sufficient, press FINISH. Otherwise, select PURGE MORE.
At the end it is necessary to remove all the extruded filament from under the nozzle; once you press OK, the printing will continue.
The last section is used for sending G-code commands, if you know them or you are guided by Trilab technician.
6) Settings screen
In the last section of the application you can connect the printer to a wireless network (CONNECT WIFI) or change the mode in which the printer is available. You can also see the IP address which was assigned to the printer when it was connected to your network and which allows you to go to WebControl in your web browser.
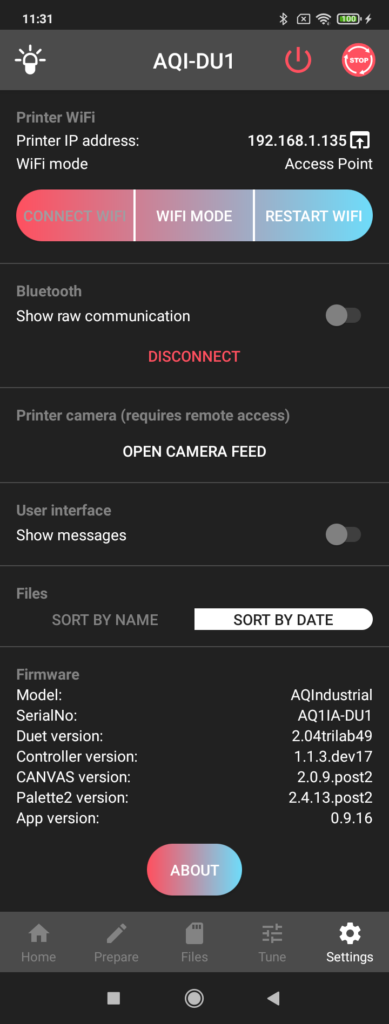
As standard, the printer looks for known Wi-Fi networks in the vicinity and tries to connect to them. The Auto and Client modes are used for this. While in the Auto mode the printer tries to connect to the network and switches to the AP mode if a connection cannot be established, in the Client mode it keeps trying to connect to the network.
If the printer does not find any networks or if a connection cannot be established, the printer switches to the AP mode and allows other devices to connect to it (after that it is advisable to connect to the company network with a password).
Choose the correct network according to the printer’s serial number and use the 12345678 password. Then in web browser (we recommend Google Chrome) type in 10.0.0.5 IP address. If the WiFi is not strong enough, use the ethernet adapter and cable for a direct connection the printer to your PC (there is no password). In this case, the IP address is 192.168.1.23.
Note: The initial password for connecting to the printer in the AP mode is 12345678.
At the very end you can see information about firmware version and applications that may help you to communicate with technicians
7) DeltaControl application updates
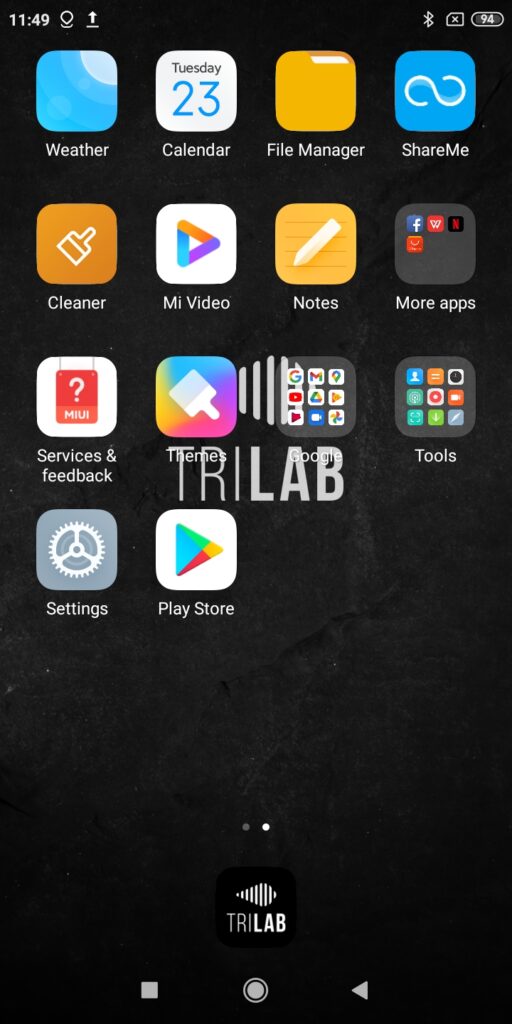
As part of constant development, updates for DeltaControl are released. The connection to the printer may not work properly without them. To check / download the updates, connect the phone to a Wi-Fi network or to your own hotspot and select Play Store (the application may also be called Google Play) on the DeltaControl display. In the picture below, it is located below the TRILAB sign, but the location may differ.
Enter “trilab” in the search field and confirm.

Choose DeltaControl by TRILAB from the list. It should be the first item on the list.

After clicking on the DeltaControl application, the content of the green button tells you whether the application is up to date. If the green button says OPEN, the application is up to date. If it says UPDATE, updates are available and you can download them by clicking the button.
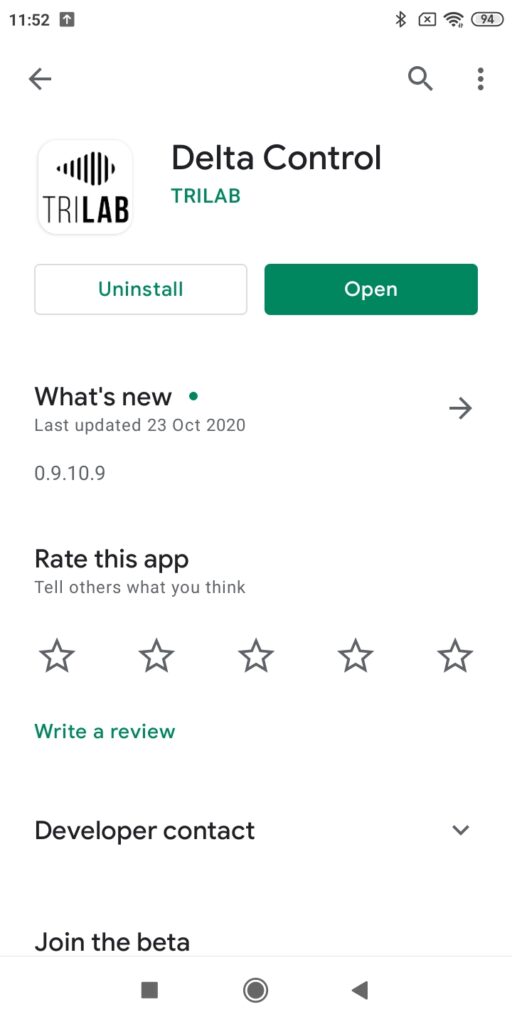
This picture is only an example – the date and update version may differ.